Showing posts with label sugar. Show all posts

Wednesday, April 6, 2016

White Chocolate Snickerdoodle Mug Cake

Hello loves! It's me Kelsey, I'm still alive! I truly, madly, deeply want to get back into the whole blogging thing because it's such a great creative outlet for me and allows me to cook and bake as much as I want.... Jake you don't mind right?

I was having my time of the month cravings last night and really just wanted something yummy and I wanted it fast.  I found a recipe from Five Heart Home for a Snickerdoodle mug cake that inspired me to create my own, so thanks for that! 


Unfortunately my photos may not do this justice since they were taken on my iPhone but you just have to trust me on this one- I would eat it every night if I was allowed to.  Even though it's made in the microwave I was shocked at how moist and cakey it came out!  One important note is to make sure to use a big enough mug with straight edges for best cooking, though mine honestly did not rise very much. 


I hope that I can continue making deliciousness but I am starting adult real person work life soon so we shall see.  At least now I will have coworkers to bring yummy gifts to!  I just moved to Denver about a month ago and Jake and I are loving it.  The restaurants are delicious and all over the place, there's friendly people everywhere, and the mountains and outdoor activities are awesome!  I don't think we will be leaving anytime soon. 


Thanks to everyone who is reading- you're all wonderful! Alright to the recipe!

Ingredients

  • 1/4 cup all purpose flour
  • 2 tbsp. sugar 
  • 1/4 tsp. baking powder
  • 1/4 tsp. cinnamon (at least)
  • 1/4 cup almond milk (you can use any kind)
  • 2 tbsp. salted butter (melted in microwave first)
  • 1/2 tsp. vanilla
  • 1/8-1/4 cup white chocolate chips 

  For garnish: 

  • 1/2 tbsp. sugar
  • 1/8 tsp. cinnamon 
Directions: 


1.  Combine flour, sugar, baking powder, cinnamon in a medium bowl.
2.  Combine almond milk, butter, and vanilla in a separate medium bowl.  Combine dry ingredients into wet until you reach a smooth consistency. 
3.  Fold in white chocolate chips.
4.  Pour 1/3 of batter into mug, sprinkle some cinnamon sugar and repeat layering process making sure to finish the top off with some cinnamon sugar. 
5.  Place in the microwave for 1 min 30 seconds-2 minutes.*

*For me it finished around 1 minute and 45 seconds but it depends on the strength of your appliance! 

Happy Baking!


Sunday, November 3, 2013

Peach Nectarine Cobbler

It's been quite awhile, hello all! I have been through a lot of major transitions lately with moving to a new city and whatnot so my apologies for being absent.  I have a few old recipes to post in the near future. 

This is a peach cobbler with a butter cookie dough frosting.  It is super duper easy, doesn't take long at all, is very sweet, and is great paired with some vanilla ice cream.


I made this in the summer when the weather was still incredibly nice and the fruit was amazing.  I used both orange nectarines and white peaches I believe.  I'm not going to lie, I made this ages ago so I don't remember the exact measurement of the fruit part (I do have exact numbers for the topping which is the most important).

I'll leave it up to you but I would recommend using 2-3 nectarines and 2-3 peaches and cutting them up.  You probably want to coat them with about 3/4 cup of sugar and some lemon juice.  You can play with the amounts (if you like it sweet add more, less sweet don't put as much).  I apologize for not making it straight forward but its pretty easy and variable.  

Below I will put the recipe for the topping!

I love each season for different reasons but the fall in Oregon is beautiful.  We have been blessed with great weather (which is just now seeming to leave us) and the leaves are falling from the trees in an array of great color.  In California I never really noticed the beauty of the Fall and the foliage here is in a much greater density so I am able to appreciate it. 

Also, the fall means fall foods like pumpkin! Anything pumpkin flavored is going to be something I like, so this time of year is amazing yet dangerous for me. 

Ingredients

This recipe makes 8-inch square pan of cobbler. 

Topping:
1/2 cup flour
1/4 tsp baking powder
pinch of salt
1 stick unsalted, softened butter
1/2 cup sugar
1 egg yolk 
1/4 tsp. vanilla 

Fruit:
4-6 nectarines/peaches
1/2-1 cup sugar
2-3 tbsp. lemon juice 


Directions: 

1.  Prepare your fruit filling and place into a pre-greased 8-inch square pan. 
2.  Mix flour, baking powder, and salt in a small bowl.
3.  Beat butter and sugar until creamy. Then, beat in the egg yolk and vanilla.  
4.  Mix in dry flour mixture.
5.  Dollop dough over the fruit (try your best to spread over evenly).
6.  Bake at 375 for about 40-50 minutes or when the crust is a golden brown color.


Enjoy this immensely! And make sure you use good, ripe fruit. 


Happy baking!

Saturday, August 10, 2013

Nectarine Blueberry Almond Galette


For those of you that don't know what a galette is it is kind of like a pie but it's open faced and you eat it like a pizza! Not a very accurate description but its how I think of it. 

This particular galette has a sugar almond mixture layer, ripe nectarines, and blueberries.

Sorry that I have been a bad baker lately- I've been so busy with work and traveling to beautiful places! This is not a complaint! My summer has been awesome, just much crazier than normal. 

Anyways, enough about me... I don't think I'd ever seen or tasted a galette before making it myself but I saw a recipe that inspired me on the blog A Cozy Kitchen and wanted to take a stab at it!

The best time to make this galette would be now when the summer fruit is fresh, juicy, and amazing. And the best time to eat this galette is right when it has cooled off a bit but is still warm.  Slap a scoop of vanilla ice cream on top of it and you will be golden. 


And don't forget to eat it like a pizza! Yummm!


Ingredients: 

This recipe makes one galette (8-9').

Crust:
1 cup all purpose flour
1 tsp. sugar
pinch of salt
4 tbsp cold water
3/4 stick of butter (cold and cubed)

Filling:
1/4 cup finely ground almonds
1/4 cup sugar
2 big ripe nectarines (or 3-4 smaller sized)
1/4 cup blueberries
1 tbsp melted butter
1 tbsp extra butter (set aside)


Directions:

Crust:

1.  In a large bowl, combine flour, sugar, and salt.  Add the butter and using your hands mix until it is starting to incorporate and form dough.  Add the water one tablespoon at a time and keep mending the ingredients until dough forms.  Flatten, cover with plastic wrap, and put in the fridge for at least 1 hour.

2.  Preheat the oven to 400 degrees F. Take the dough out of the fridge and roll out on a floured surface until it is only about 1/8 of an inch thick.  Place a piece of parchment paper on a baking sheet and transfer the rolled out dough to the baking sheet. 

Filling:

1. Grind a handful of almonds in a food processor until fine. In a small bowl combine sugar and ground almonds.  Sprinkle 3/4's of this mixture into the center of the dough.


2.  Cut up your nectarines into thin slices and make sure they are extra ripe! Place them and the blueberries in a pattern of your choice on top of almond/sugar mixture. Sprinkle remaining almond/sugar mixture over the fruit. 


3.  Fold in the border of the dough at an angle and pinch the dough together so that it is sealed and doesn't fall apart. 


4.  Brush the dough with the melted butter and sprinkle on some sugar on top of that.  This will give the dough a nice crunch. 

5.  Bake in a lower (not the lowest) section of the oven for about 45 minutes, or until the crust looks very well browned and the fruit is bubbling! 

6.  Remove from the oven and cool for about 10-15 minutes, slice up, and serve. 

Happy Baking everybody!

Monday, May 20, 2013

Baked Churros

Hola señores y señoras! Buenas tardes!


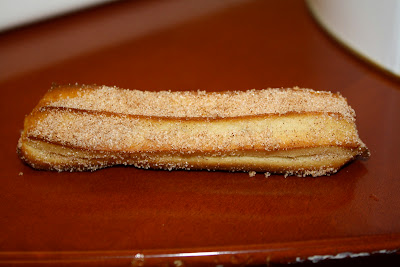
These are authentic spanish churros, made by your one and only Kelsey.  Although traditionally in Spain they are baked plain and dipped in chocolate, I decided to go the American route and coat them with cinnamon and sugar instead. 

I have many fond memories of going to San Francisco Giants game when I was little and always making sure I got a nice warm churro before I left.  I never realized how easy they were to make!  It is true that most places probably are deep frying their churros but I wanted to make them healthier and easier for myself to make. 

I made these a few weeks ago for my spanish class at school for some end of the semester extra credit.  Because of this I made about 20 churros that were much smaller than normal (maybe 3 inches long) because I needed more, instead of your typical foot long churro.  


These do tend to cool off pretty quick though so you are going to want to try and serve them right away or keep them on a low warm setting in the oven.  I had to make these the night before I served them so I broiled them for a few minutes in the oven the next morning, but they were definitely not as good as they were right after they had finished baking. Make sure you store them in a dry air tight container if you are not serving right away.

I am officially on summer and can't wait to share a wide range of recipes with you all.  Up next are butterscotch caramel Smores bars!

Also want to make sure I give a shout out to Sprinkle Bakes, one of my favorite blogs, for the inspiration for this recipe!

Ingredients: 

This recipe makes about 10, 7 inch churros. 

2 tbsp brown sugar
1/2 tsp. salt
1/3 cup Earth Balance (or butter)
1 cup all purpose flour
2 eggs
1 tsp. vanilla

1/4 cup sugar
1 tsp cinnamon

Optional: olive oil

Directions: 

1. Preheat the oven to 425 degrees and pre-grease baking sheets. 
2. In a medium saucepan, combine the water, brown sugar, and salt and stir until dissolved (on no heat).
3. Add in margarine or butter over medium heat until melted and it starts to boil.  Remove from heat and add flour.  Mix thoroughly.
4. In a small bowl combine the eggs and vanilla.  Add this mixture to the dough and combine until completely incorporated using a fork or a wooden spoon.
5. Let the dough cool, refrigerate if needed.  This is necessary to pipe the churros and have a ridges pattern.


6. Once the dough has cooled, pipe the churros using a very wide star tip onto a baking pan that is greased or lined with parchment.  For each churro that is piped. you will probably need to use scissors to cut the end of the dough as it will not stop coming out without doing this. 

My churros were very small you can make yours as big or as small as you would like. 


7. Bake for about 10 minutes or until the sides are a very light brown color and have slightly puffed up.  Then turn on the broiler and watch for a minute or 2 while they turn more crispy. 
8. Immediately after they have been removed from the oven you are going to need to roll each churro in a cinnamon sugar mixture.  If you find that it is not sticking well enough, you can brush each churro with a small amount of olive oil and then roll it in the cinnamon sugar. 

Serve and eat as soon as possible!


Definitely a very short prep time and cooking time as well which make these much easier than I ever imagined!

Thanks for tuning in! I hope you enjoy them as much as I did! Happy Baking everyone!

Friday, February 8, 2013

Rocky Road Brownies

First of all I am SO sorry that I have not posted in about 3 weeks, I have just gotten back into the rhythm of school and readjusting to college life- my apologies.  But this is worth the wait! They are Rocky Road brownies.  A light cakey brownie with marshmallows, chopped pecans or walnuts, and chocolate chips. 


I spontaneously made these two nights before I left home, I knew I needed one last hoorah before my baking days would soon be limited.  They take basically no time at all if you have the ingredients handy.

Another note: The brownies will probably take longer or shorter than indicated depending on your oven and they will still seem a little of gooey when you take them out.  Keep in mind that this is due to the marshmallows that you have added.  Once it is removed from the oven let it cool and it should solidify nicely. 


I am happy to see that I am continuing to gain more and more views and interest via Pinterest, Google, and Facebook so thank you so much to all of my supporters who have helped me along the way and continue to check in with "Ever So Sweet" on a regular basis.  You guys are so awesome!

I never actually was much of a fan of Rocky Road ice cream... shoot me now, I know.  I was more of a cookie dough or mint chocolate chip kind of gal but nevertheless I will not argue with these brownies.  Especially with a scoop of vanilla ice cream on the side they are quite marvelous.


Ingredients:

This recipe makes one 9x9 square of brownies. 

4 ounces unsweetened chocolate
1 stick unsalted butter
1/2 cup + 2 tbsp. all-purpose flour
1/4 tsp. baking powder
3 eggs
1 1/4 cups granulated sugar
1/4 tsp. salt
35-50 mini marshmallows
1/2 cup chocolate chips
1/2 cup chopped walnuts or pecans

Directions: 

Start off my preheating the oven to 350 and lining your 9x9 square pan with aluminum foil.
Melt 4 oz. of chocolate and butter in the microwave in 30 seconds intervals, stirring in between.
Whisk the flour and baking powder together in a separate bowl small bowl.
In an electric mixer combine eggs, sugar, and salt.  Beat on high speed until it turns thick, pale yellow, and has increased a decent amount in volume (about 2-3 minutes). 
Pour in the butter/chocolate mixture and fold in with a spatula. 
Sift the flour mixture in, while folding again with the spatula and being careful not to overmix.
Pour the batter into the foil lined pan.


Distribute the chopped walnuts (or pecans), chocolate chips, and mini marshmallows over the surface.  


Poke the mini marshmallows into the batter with a fork or finger so that just the top is visible. 
Bake 25-35 minutes (make sure to keep an eye on this before you reach the time limit, a toothpick inserted should come out cooked but not necessarily clean).
Once it is done cooking, allow to cool completely before cutting and consuming!

This recipe was developed from a cookies, bars, and brownies cookbook that my Aunt gave me for the holidays- very sweet of her!

Enjoy your weekend and Happy almost Valentines Day! 
P.S. Happy Baking!

Friday, January 18, 2013

Oatmeal Peanut Butter Heath Bar Cookies

It was a late night.  I could feel the need for baking rushing through my blood.  I spotted the Heath Bar bits in my freezer, the Quaker Oats staring me in the eye from the pantry, and the smooth peanut butter not far off.  The combination was meant to be! 


I quickly looked up some sort of recipe that I could go off of to get me started but exchanged the Heath Bar for the chocolate chips that were required in this recipe: Simply Scratch.


Right now I am sitting in my living room drowning in Kleenex and wishing that I could be going for a run in this beautiful California weather.  But I can't because I have one clogged ear, two runny nostrils, and a burning throat.  To top it off I was blessed with this state while on vacation in Cabo San Lucas with my mom!  I have to return to school in 2 or 3 days and really hope I am better because flying with this monster was no fun the first time around! 

Anyways... I would love to bake right now but everyone is afraid of me so sadly I guess that won't happen until I am healthy (it's probably for the best).  

So yes, these cookies were delicious and easy and fabulous and you must try them and I am sorry for my lack of imagination today as I am not feeling very zippy. 

Here we go:

Ingredients:

2 1/2 cups of Quaker oats
1 cup all purpose flour
1/2 cup whole wheat flour
2 tsp. baking soda
1/2 tsp. salt
2 sticks unsalted butter
1 cup smooth peanut butter
3/4 cup dark brown sugar, packed
3/4 cup granulated sugar
2 eggs
3/4 tsp. vanilla
1 cup Heath Bar bits (or more if you want)


Directions:

Preheat the oven to 350.
Combine the dry ingredients in a medium sized bowl: oats, flour, whole wheat flour, baking soda, and salt.
Combine butter, peanut butter, and sugars in an electric mixer and mix until fully incorporated (a few minutes).
Add eggs one at a time followed by the vanilla.
While mixing on low speed, slowly add in the dry ingredients and mix until combined.  
Stir in Heath Bar bits.


Form round spoonfuls of cookie dough onto a lined cookie sheet and place evenly apart, allowing room for expansion. 
Press lightly down on each ball of cookie dough to flatten slightly.


Bake for 10-13 minutes and remove from the oven to allow them to cool on a rack.

Enjoy with milk while warm and gooey! Happy Baking and next time you hear from me it will most likely be from Portlandia!

Saturday, December 29, 2012

Peanut Butter Hershey's Kiss Cookies

These peanut butter chocolate cookies are decadent and so ridiculously easy.  Only 4 ingredients are needed: peanut butter, sugar, eggs, and Hershey's chocolate kisses.  No flour, no baking powder, no hassle.  


I could not believe it when I saw the recipe but my boyfriends mom insisted she had made them plenty of times and that they come out delicious.  This could not be more true! 

You have to try these.  They take 10 minutes at the most to create and only 10 more to bake! And they taste amazing right out of the oven with the melted warm chocolate.  They disappeared so fast and I am already craving more already.

I hope everyone is getting ready for the new year, 2013 here we come!

Again, I want to acknowledge that I got this recipe from my boyfriends mom, Sharon, so she receives worthy credit. 

Ingredients

This makes 35-40 peanut butter chocolate cookies.


2 cups granulated sugar
2 eggs
2 cups creamy peanut butter
35-40 chocolate Hershey's kisses 


Directions: 

Preheat the oven to 350.  
Mix together using a wooden spoon or spatula the sugar, eggs, and peanut butter until full combined.
Roll the dough into 1-inch balls and place spread apart onto 2 ungreased nonstick cookie sheets. 
Bake in the oven for about 10 minutes, or until the edges start to turn a light golden brown color. 
Remove from the oven and immediately place the Hershey's kiss into the center of the cookie.  (Make sure to insert it far enough in so that it is secure but not so that it goes all the way through)
Enjoy and consume while warm, mmm mmm good!

I told you it was easy! A must try holiday treat to bring forth the New Year! Hope you are all having a wonderful weekend. 

Happy baking!