Showing posts with label food. Show all posts

Friday, February 8, 2013

Rocky Road Brownies

First of all I am SO sorry that I have not posted in about 3 weeks, I have just gotten back into the rhythm of school and readjusting to college life- my apologies.  But this is worth the wait! They are Rocky Road brownies.  A light cakey brownie with marshmallows, chopped pecans or walnuts, and chocolate chips. 


I spontaneously made these two nights before I left home, I knew I needed one last hoorah before my baking days would soon be limited.  They take basically no time at all if you have the ingredients handy.

Another note: The brownies will probably take longer or shorter than indicated depending on your oven and they will still seem a little of gooey when you take them out.  Keep in mind that this is due to the marshmallows that you have added.  Once it is removed from the oven let it cool and it should solidify nicely. 


I am happy to see that I am continuing to gain more and more views and interest via Pinterest, Google, and Facebook so thank you so much to all of my supporters who have helped me along the way and continue to check in with "Ever So Sweet" on a regular basis.  You guys are so awesome!

I never actually was much of a fan of Rocky Road ice cream... shoot me now, I know.  I was more of a cookie dough or mint chocolate chip kind of gal but nevertheless I will not argue with these brownies.  Especially with a scoop of vanilla ice cream on the side they are quite marvelous.


Ingredients:

This recipe makes one 9x9 square of brownies. 

4 ounces unsweetened chocolate
1 stick unsalted butter
1/2 cup + 2 tbsp. all-purpose flour
1/4 tsp. baking powder
3 eggs
1 1/4 cups granulated sugar
1/4 tsp. salt
35-50 mini marshmallows
1/2 cup chocolate chips
1/2 cup chopped walnuts or pecans

Directions: 

Start off my preheating the oven to 350 and lining your 9x9 square pan with aluminum foil.
Melt 4 oz. of chocolate and butter in the microwave in 30 seconds intervals, stirring in between.
Whisk the flour and baking powder together in a separate bowl small bowl.
In an electric mixer combine eggs, sugar, and salt.  Beat on high speed until it turns thick, pale yellow, and has increased a decent amount in volume (about 2-3 minutes). 
Pour in the butter/chocolate mixture and fold in with a spatula. 
Sift the flour mixture in, while folding again with the spatula and being careful not to overmix.
Pour the batter into the foil lined pan.


Distribute the chopped walnuts (or pecans), chocolate chips, and mini marshmallows over the surface.  


Poke the mini marshmallows into the batter with a fork or finger so that just the top is visible. 
Bake 25-35 minutes (make sure to keep an eye on this before you reach the time limit, a toothpick inserted should come out cooked but not necessarily clean).
Once it is done cooking, allow to cool completely before cutting and consuming!

This recipe was developed from a cookies, bars, and brownies cookbook that my Aunt gave me for the holidays- very sweet of her!

Enjoy your weekend and Happy almost Valentines Day! 
P.S. Happy Baking!

Friday, January 18, 2013

Oatmeal Peanut Butter Heath Bar Cookies

It was a late night.  I could feel the need for baking rushing through my blood.  I spotted the Heath Bar bits in my freezer, the Quaker Oats staring me in the eye from the pantry, and the smooth peanut butter not far off.  The combination was meant to be! 


I quickly looked up some sort of recipe that I could go off of to get me started but exchanged the Heath Bar for the chocolate chips that were required in this recipe: Simply Scratch.


Right now I am sitting in my living room drowning in Kleenex and wishing that I could be going for a run in this beautiful California weather.  But I can't because I have one clogged ear, two runny nostrils, and a burning throat.  To top it off I was blessed with this state while on vacation in Cabo San Lucas with my mom!  I have to return to school in 2 or 3 days and really hope I am better because flying with this monster was no fun the first time around! 

Anyways... I would love to bake right now but everyone is afraid of me so sadly I guess that won't happen until I am healthy (it's probably for the best).  

So yes, these cookies were delicious and easy and fabulous and you must try them and I am sorry for my lack of imagination today as I am not feeling very zippy. 

Here we go:

Ingredients:

2 1/2 cups of Quaker oats
1 cup all purpose flour
1/2 cup whole wheat flour
2 tsp. baking soda
1/2 tsp. salt
2 sticks unsalted butter
1 cup smooth peanut butter
3/4 cup dark brown sugar, packed
3/4 cup granulated sugar
2 eggs
3/4 tsp. vanilla
1 cup Heath Bar bits (or more if you want)


Directions:

Preheat the oven to 350.
Combine the dry ingredients in a medium sized bowl: oats, flour, whole wheat flour, baking soda, and salt.
Combine butter, peanut butter, and sugars in an electric mixer and mix until fully incorporated (a few minutes).
Add eggs one at a time followed by the vanilla.
While mixing on low speed, slowly add in the dry ingredients and mix until combined.  
Stir in Heath Bar bits.


Form round spoonfuls of cookie dough onto a lined cookie sheet and place evenly apart, allowing room for expansion. 
Press lightly down on each ball of cookie dough to flatten slightly.


Bake for 10-13 minutes and remove from the oven to allow them to cool on a rack.

Enjoy with milk while warm and gooey! Happy Baking and next time you hear from me it will most likely be from Portlandia!

Tuesday, November 27, 2012

Happy Thanksgiving!

Hey everyone! I hope you all had a wonderful holiday.  I stayed in Half Moon Bay with 20 of my family members at a very nice hotel so I had a buffet Thanksgiving dinner, which oddly enough did not include pumpkin pie... So as soon as I got home 3 days later I busted out the giant can of pumpkin puree and got to it.


This post is not going to include a recipe because I just boring and used the recipe on the can with one exception: I didn't use the full 2 cans of evaporated milk, I just used 1 and a half, which I find often works better.

I used Libby's pumpkin puree and the recipe can be found here: Libby's Pumpkin Pie Recipe.

It didn't totally feel like Thanksgiving to me because most years I am used to slaving away in the kitchen all day and when it is finally time to eat it feels very rewarding. But my family usually has the same meal on Christmas Eve so I will have that to look forward to!

I have many things to be thankful for this year: my great new school and education I am receiving (Lewis & Clark College), my friends, my supportive family, good health, the Giants winning the World Series, and much more! I hope you all have many things to be thankful for as well.


The pie disappeared pretty quickly to no surprise!

In a few days I will be making a cake for two of my friends at school who recently had birthdays so keep your eyes peeled!

Have a great Tuesday afternoon and Happy Baking!

Monday, November 19, 2012

Kappa Sigma Red Velvet Cupcakes with Cream Cheese Frosting

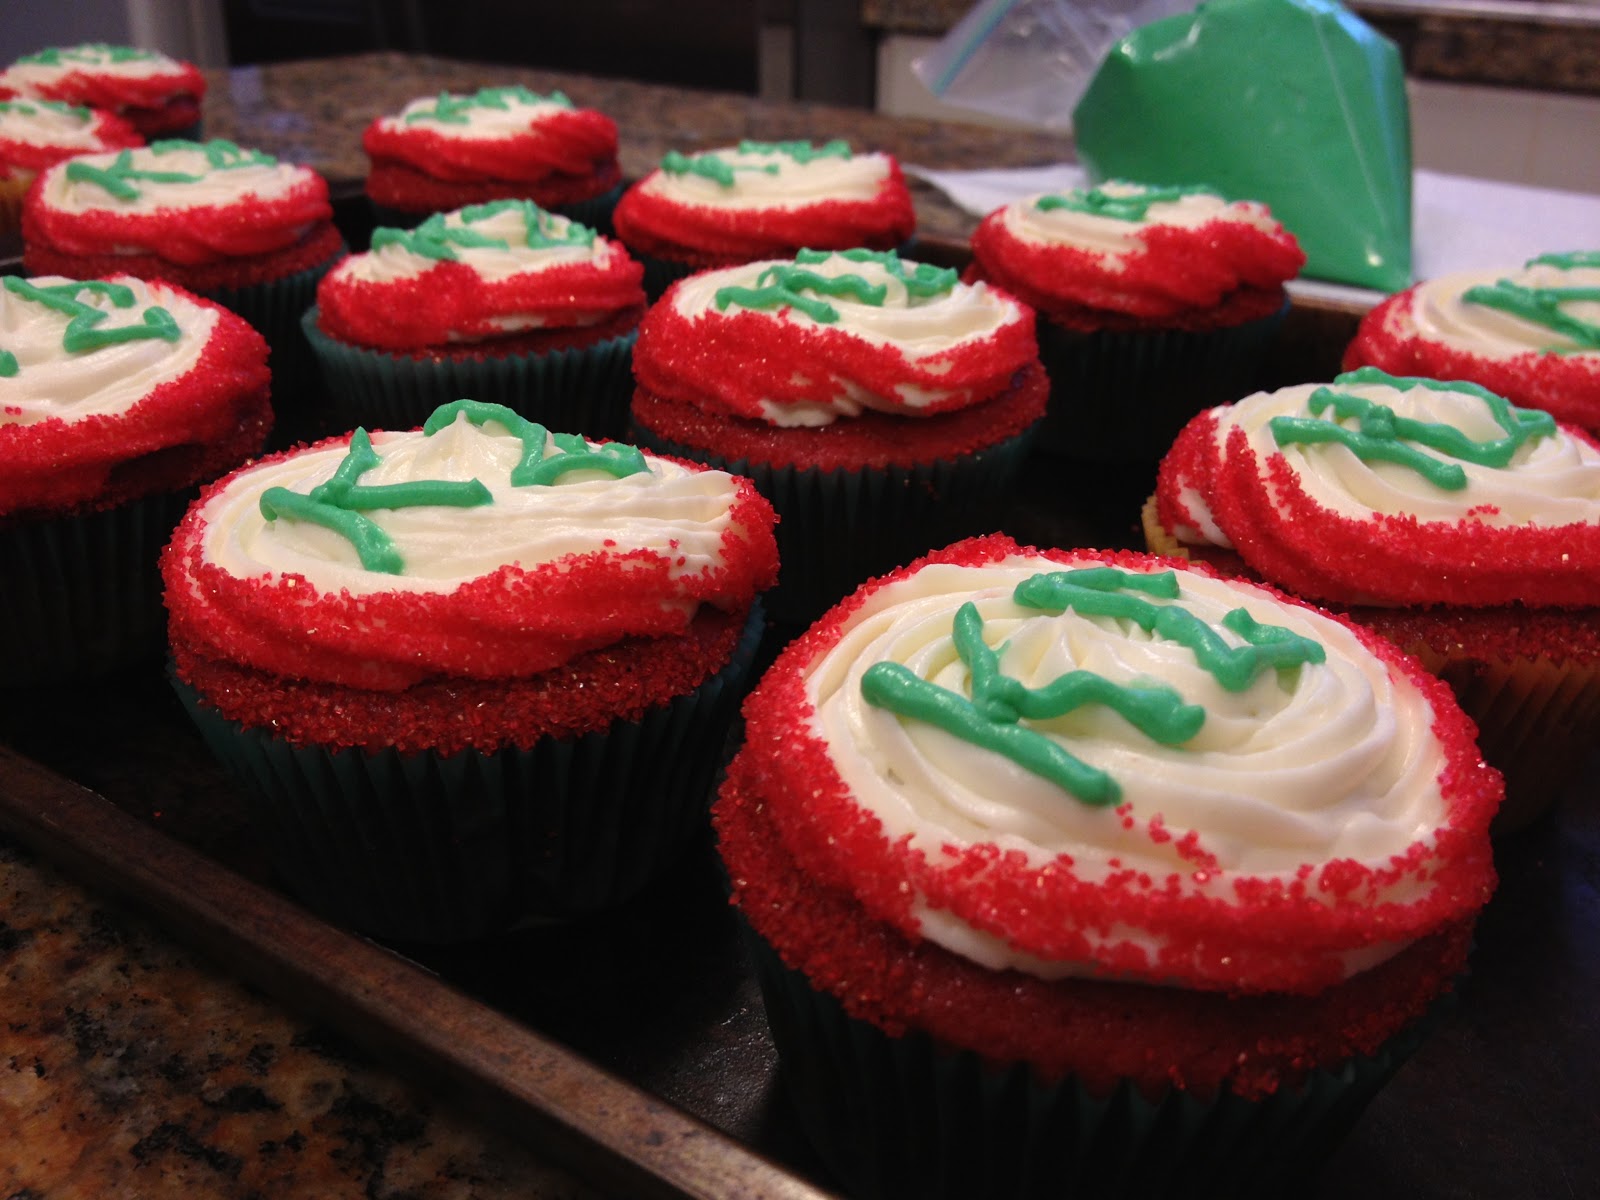
These are red velvet cupcakes, which I have never actually made before, with a decadent cream cheese frosting, red sprinkles around the rim, and Kappa Sigma lettering!


As most of y'all know by now my boyfriend, Jake goes to Willamette University and I go visit him there once a month or so.  He is in the Kappa Sigma fraternity there... and no it is not a "frat." 

I love to bake there because I get to be in the house kitchen and my treats get enjoyed and devoured in a very short amount of time with much appreciation.  


This past weekend when I was visiting was the fraternities initiation for new pledges (which I have somehow managed to be there for 2 years in a row).  So... because of all the events that were going on I had a good amount of time to kill so I figured what better to do than to bake! I spent 3-4 hours in a quiet kitchen with my music and enjoyed the heck out of it.  It had been way too long since the last time I had a date with the mixing bowl.  


I was inspired by Joy of Baking for this recipe. 

Ingredients:

This recipe makes 32-36 regular-sized cupcakes.

For the red velvet cupcakes:
3 3/4 cups all-purpose flour
3/4 tsp. baking powder
3/4 tsp. salt
3 tbsp. cocoa powder
3/4 cup unsalted butter
3 eggs
1 1/2 tsp. vanilla extract
1 1/2 cups buttermilk
2-3 tbsp. red food coloring
1 1/2 tsp. white vinegar
1 1/2 tsp. baking soda

For the cream cheese frosting:
24 oz. cream cheese (this is 3 packages)
1 1/2 tsp. vanilla extract
2 1/4 cups sifted powdered sugar
1 1/3 cups heavy whipping cream

Also used: 
green food coloring
red sprinkles 

Directions:

For the red velvet cupcakes: 
Preheat the oven to 350.
Prepare 3 cupcake tins with cupcakes liners. 
Sift together flour, baking powder, salt, and cocoa powder. 


Beat butter on medium speed in an electric mixer for 1-2 minutes.  
Add sugar and mix well.  Continue by adding eggs one at a time, followed by the addition of the vanilla extract (continue to scrape down the sides after each step).


In a separate bowl measure out the buttermilk.
Begin adding red food coloring drop by drop, while whisking, until you reach a deep red color.


Switch off adding the red buttermilk and the dry ingredients to the butter mixture (beginning and ending with the dry ingredients). 


In a small separate bowl or cup combine white wine vinegar and baking soda.  Let it fizz and once it has settled down fold it into the batter.


Divide the batter amongst the cupcake liners, filling about 2/3 full, and baking for 18-23 minutes (or until toothpick comes out clean. 


For the cream cheese frosting:
Beat room temperature cream cheese in an electric mixer until creamy.
Add vanilla and then in increments add sifted powdered sugar.  
Slowly add in the heavy whipping cream and mix on high until the frosting is thick enough to pipe.  


Decoration:
First, begin by piping the cream cheese frosting using a wide star-shaped tip onto the cupcakes.  (Optional: Save some to make the leftover frosting green to use for writing)


Pour a bottle of red sprinkles into a large bowl to coat the bottom. 


Dip the edges of the cupcake into the sprinkles and do your best to make sure they are coated evenly.

 
Using the leftover frosting, dye it green, and create lettering of your choice! I used the Kappa Sigma letters but if you want you can draw a christmas tree or write something creative! 


Now all you have to do is eat it and enjoy!


Not to mention the house is beautifully decorated for Christmas! Hope to be back there soon! Props to Jason!


Enjoy your Thanksgiving everyone! Hope you all get fat and happy! 
And as always... happy baking!

Friday, October 12, 2012

Banana, Oatmeal, Chocolate Chunk, and Reeses Bars

Let me start by saying these were gone in 24 hours.  I do live in a dorm with tons of hungry teenagers, but still, they disappeared in the blink of an eye. 


It was hard to come up with a title for these.  Technically they were made in a 9x13 pan and should be called bars.  But they were moist and had a more fluffy texture so it was more like bread than a bar.  I guess it falls somewhere it between.  

There is a plethora of wonderful ingredients in here but some of them include: oats, overripe bananas, chopped Reeses, and chocolate chips.  Can't get much better than that can it? 


After it was done baking, I melted some chocolate chips with a few tablespoons of heavy whipping cream and drizzled it over the top.  A must do.  

I am on "Fall Break" right now, which is just a few days off of school and it is quite nice to have a mental break.  I'm at Willamette University right now visiting my boy, and it's his 20th birthday next week! Because I can't be here with him on his special day we are going to make a cake together and have a pre-birthday celebration.

Back to the recipe... I made this in between classes one day and it was really simple so if you are in a crunch it's a good one to do!  I had 2 seriously overripe bananas that I'd bought and was trying to figure out what to do with them (I hate wasting food).  Breakfast muffins?  Chocolate chip muffins?  Banana bread? Smoothie?

I finally arrived at this!

This recipe was inspired (but changed a bit) by the Bon Appetit cookbook.


This was the sad last piece left!

Ingredients:

2 cups all-purpose flour
1 cup oats
1 tbsp. baking powder
1/2 tsp. salt
2 sticks unsalted butter, room temp
1 1/4 cups sugar
1 cup packed brown sugar
2 eggs
2 very ripe bananas
2 tsp. vanilla
1/2-1 cup chocolate chips
4-6 Reeses cups, chopped

Directions:

Preheat the oven to 350. 

Take two bananas that look like this:


And turn them into this: 


Mush up thoroughly with a fork until you reach a smooth consistency. 

Blend the dry ingredients in a separate medium sized bowl: flour, oats, baking powder, and salt. 

In a large mixing bowl combine the butter and sugar with an electric mixer.

Then, add both eggs, one at a time.

Beat in the banana mush mixture, followed by the vanilla.

Stir the flour mixture slowly into the wet ingredients.


Stir in the chocolate chips and Reeses cups (determine the amount yourself based on how much chocolate you want).  


Pour the mixture into a pre-greased 9x13 baking pan.  

Bake until the top is golden brown at 350 for about 35-45 minutes. 

Once they have been removed from the oven allow to cool completely.

I took some chocolate chips (about 1/4 cup) and a few tablespoons of whipping cream to reach a thin consistency and drizzled it over the top for some added oomph. 


If you like bananas and chocolate I can guarantee you will LOVE these.   

Sidenote:


I am from San Francisco and am a huge Giants fan.  The NLDS can be summed up in one word: torture.  Not only are we the first National League team to come back and win the series from an 0-2 deficit.  The Cincinnati Reds had not been swept 3 games in a row at home all season.  Let's go Giants and let's continue to kick some butt in the NLCS. 

Happy Friday and Happy Baking!


Monday, October 8, 2012

Chocolate Peanut Butter Mini Cheesecakes

College Cooking Episode #2!  Reeses are by far my favorite candy in the world.  Chocolate and peanut butter, independently, are way up there on my favorite foods list and when combined... oh don't even get me started.


This was my first time making cheesecake so I am definitely a rookie and made a few minor mistakes but we have to make mistakes to learn, right? 

I would eat cheesecake every day if I could but my conscience won't let me.  I guess its for the best. 


This particular cheesecake has an Oreo crust, a peanut butter cheesecake, a chocolate ganache topping, and chopped up Reese's to put on top.  The recipe makes about 12 mini's or one whole cheesecake.  I had to use my cupcake pan because its all I had, but I would recommend using something made specifically for cheesecakes if you have it.  

Last week, when I somehow ended up doing the most baking I've done since I have been here, I had so much going on.  I had my chemistry and biology midterms as well as my boyfriend running the Portland marathon on Sunday.  He had a fabulous time of about 3 hours and 23 minutes, which is around a 7:45/mile pace.  I am so proud of him and just wanted to make sure I acknowledged it here. 


This recipe is inspired by the blog, Gimme Some Oven.

Ingredients:

This recipe makes about 12 mini cheesecakes. 

For the oreo crust:
1 cup finely chopped Oreo's
2 tbsp. melted butter

For the peanut butter cheesecakes:
16 oz. softened cream cheese
1/2 cup smooth peanut butter
3/4 cup packed brown sugar
2 eggs
1/4 cup heavy whipping cream
1/2 tsp. vanilla

For the chocolate ganache:
1 cup chocolate chips
3 tbsp. heavy whipping cream
1 tbsp. powdered sugar

*Also: chopped up Reese's candy for garnish.

Directions:

For the oreo crust:
Finely chop up 1 cup of Oreo's. 


Melt butter in a microwave safe bowl and add in the chopped oreos. Mix well.  
Evenly distribute the crust among 12 pre-greased cupcake slots. 
Push down to the bottom and flatten with a spoon so it it just the base. 
Bake the crust at 350 degrees for 5 minutes. 


For the peanut butter cheesecake: 
Tips: 
1) Bake in a water bath.
2) Do not open the oven while they are baking.
3) The center should still be a little jiggly when they are done cooking. 
4) Do not over mix/beat the batter.

With an electric mixer combine peanut butter and softened cream cheese until thoroughly mixed. 


Add sugar and continue mixing until combined.  Then, add in eggs one at a time, followed by the cream and vanilla, mixing until it is just combined. 


Transfer the batter to the baking pan with a spoon or ice cream scoop, filling each container as much as possible.  Bake at 350 for 13-15 minutes or until they are starting to turn brown and the majority of the surface has firmed up.  


When they are done baking, open the oven a crack and let cool for 15 minutes, then remove from the oven and let them cool completely before attempting to separate them from the pan.  This is necessary as cheesecakes are very sensitive to sudden changes in temperature. 

Refrigerate for several hours before topping with ganache and Reeses. 

For the chocolate ganache: 
Melt the chocolate chips and cream in a microwave safe bowl in 15 second intervals until it has reached the consistency you want.  


Add 1 or more tbsp. of powdered sugar to thicken.  Feel free to increase the recipe size by about 50% as I found that it would have been better if it was spilling off the sides.  

After the cheesecakes are done chilling, transfer the ganache to the top of the cheesecakes.  I did this by spooning it on and spreading with a knife but choose whatever method you prefer. 


Last but surely not least: top with Reeses!


I already miss these things- they were so yummy and I will definitely be making them again at some point with my lessons learned on what to do the next time around.  

My hall mates were not disappointed.  Cute look Jordan... 


As always feel free to contact me with any questions and I hope you give these a shot.  You honestly cannot go wrong with this combination of ingredients. 

Happy October and Happy baking!