Showing posts with label bars. Show all posts

Monday, August 26, 2013

Deconstructed S'mores

So not going to lie but I did not have a lot of faith in this recipe until it was complete. Meaning along the way I was not sure if I was doing it right but then in the end it was delicious. 


My cousin Kate sent me this recipe months ago and before I went back to school (which is where I am now) I decided to make it! My friend Chelsea helped me make it and eat it too! Love you Chels! 

I am stealing my cousins title for it which is "Deconstructed S'mores."  Basically there are 4 layers, all essential, and together equal perfection.  The bottom layer is made of Biscoff cookies (among other things), the second layer is a butterscotch layer, the third is a marshmallow layer, and the final fourth layer is dark chocolate. 

Just make these.  Take my word for it.  Specific warning on the butterscotch layer though.  I used Nestle butterscotch chips which melt in a very peculiar way.  I tried melting them in a pan and continued trying to melt them in the microwave.  It turns into this kind of chunky consistency but don't worry.  Just try to spread it out as much as you can and it will somehow all come together in the end.  It just doesn't look very appetizing in the moment of melting. 

I'm not even the biggest S'mores fan but these I could eat these all day long.  Thank you Kate so much for this recipe! I will definitely be doing it again- maybe an entire pan just for Jake. Side story: I saved my boyfriend a hefty chunk of this dessert and brought it to him on the airplane and everything and he devoured it very quickly- which is a good sign. 

Ingredients:

Cookie Layer:
- 1 package Biscoff cookies
- 2 tbsp. brown sugar
- 1 stick butter

Butterscotch Layer:
- 3/4 package butterscotch chips
- 2 tbsp. heavy cream
- 1/2 tsp. sea salt
- 1/2 tsp. cinnamon

Marshmallow Layer:
- 1.5 cups marshmallow fluff (a little more than one container)
- 1/2 tsp. cinnamon
- 1 tbsp. butter

Chocolate Layer:
- 3 cups chocolate chips (semi sweet)
- 1 tbsp. shortening
- 1/2 tsp. sea salt

*Flake salt to sprinkle on top.                                  

                                                                                                
Directions: 

1. Preheat the oven to 350.  Place the whole package of Biscoff cookies in a food processor and grind thoroughly.  Add in the brown sugar and melted butter.  Press crust ingredients into a greased 9x13 inch baking pan.  Bake for 17 minutes and cool completely.

2.  Melt the butterscotch chips with heavy cream in a saucepan.  Stir constantly.  Mix in cinnamon and salt.  Spread as evenly as possible over cooled cookie layer.  Chill in the fridge for 15-30 minutes. 

3.  For the marshmallow layer, microwave marshmallow fluff with cinnamon and butter for about 30 seconds or until liquified.  Mix with a spoon to incorporate all the ingredients together.  Pour over chilled butterscotch for 15-30 minutes.


4.  Melt the chocolate chips and butter either in a double boiler or in the microwave.  Spread the chocolate over the chilled marshmallow.  Sprinkle flaked sea salt over the chocolate.  Chill for 45 minutes to an hour.  If you don't have much time you can place in the freezer as well. 

5.  Cut up and enjoy, but always keep in the fridge when not serving or consuming! Enjoy!


Monday, June 3, 2013

Nanaimo Bars

Most of you have probably never heard of these so called, Nanaimo bars, but now that you know what they are there is no turning back!  They are rich, creamy, and decadent... enough said!


Basically these consist of three different layers.  The bottom layer is mostly made up of coconut, graham cracker, pecans or almonds, and cocoa powder.  The middle layer is creamy made with heavy whipping cream, butter, pudding mix, and powdered sugar.  The top layer is the most simple but brings it to completion: chocolate and butter.  

When I was at school last semester my friends mom made some of these for him one day and I tried them.  I had never had them before and I really enjoyed them so I figured that once I got home I would try to make them myself.  With having no clue what they were made out of I referred to one of my favorite blogs, Cooking Classy, to begin my adventure. 


My mom called on my baking "expertise" to make something to bring to my brothers lacrosse banquet and I thought it would be the perfect opportunity to give it a shot.  I had to hope that it would all work out because I did not have the time for it not to.  Luckily it did, and now I get to share it with you all!  Another awesome thing about this recipe is that you don't have to bake anything all you do is prepare it and its pretty much ready to eat!

Update: I am loving summer and can't get enough of this beautiful weather.  I am working 2 hostess jobs to make some money but I am trying to have a fare amount of relaxing as well.


Ingredients:

This recipe makes about a 9"x14" pan of bars. 

Base layer: 
1 cup diced salted butter
2/3 cup brown sugar
6 tbsp. cocoa powder
2 eggs, beaten
3 tsp. vanilla
3.5 cups graham cracker crumbs
1.5 cups shredded sweetened coconut
1 cup finely chopped almonds (or pecans)

Middle layer:
2/3 cup softened salted butter
1/2 cup heavy whipping cream
4 tbsp. vanilla pudding mix 
4 cups powdered sugar

Top Layer: 
1 cup semisweet chocolate chips
4 tbsp salted butter

Directions:

Base layer:
Melt butter in saucepan over medium heat.  Once melted, remove from heat and add in brown sugar and cocoa powder until fully combined. 
Continue whisking and while doing so, add in the 2 beaten eggs and combine. 
Return to heat for several minutes until it has thickened.  Stir in vanilla once removed from heat. 
Using a food processor, make the designated amount of finely chopped graham cracker, shredded coconut, and almonds.  I made all of these ingredients pretty fine but it is technically up to you if you want it to be more crunchy!  The picture below is the almonds. 


Once you have combined the graham cracker, coconut, and almonds in a large glass bowl, pour in the chocolate mixture and using a spatula mix until fully coated. 


Press this into a even layer in a pre-greased pan, cover, and place in the freezer for 15-20 minutes. 

For the middle layer:
Using an electric mixer combine butter, heavy whipping cream, and pudding mix for several minutes until smooth and creamy.  
Add in powdered sugar and beat slowly until fully incorporated. 
Spread mixture in an even layer over the base layer, cover, and freeze for 10-15 minutes. 


For the top layer: 
Melt chocolate chips and butter in a heatproof bowl either in 30 second intervals in the microwave (with stirring in between) or over a pot of boiling water. 


Spread this evenly over the preceding two layers of the bars, cover, and refrigerate until ready to eat!
These should definitely be cold right up until the time they are served or else they start to melt pretty quick!  Not the type of dessert that should be left out for awhile! 


These are a new, hip, modern dessert that will not disappoint.  Even my mom who hates shredded coconut liked them!  I hope you try these out and that you are having a great start to the new month of June! 

Happy baking!

Friday, March 29, 2013

Pumpkin Spiced Ginger Cheesecake Bars

Yes, another cheesecake item!  I'm not really even sure what to call them because they were baked in a 9 inch round pan and could easily be called a normal cheesecake, but on the other hand I kind of cut them into square shapes so I decided to call them bars but be what they will (aka delicious).


Let me just say that there was a lot of tampering and changing of things within this original recipe that I started with but they turned out great! 

I have been a bad blogger lately and I can totally put all of the blame on college!  I've never been so busy in my life and I couldn't even tell you what I've been up to.  Just constant class, homework, labs, meetings, meals, and the very minimal amount of relaxing time is spent catching up on my TV shows or sleeping.  So I know I apologize all the time, but I really am sorry and hope that this summer I can bring you all some smashing new recipes!


I have discovered that in the past year or so heavy dairy makes my digestive system hate me so I usually will buy 1/3 less fat cream cheese and avoid heavy cream but I decided to just go for it with this baby because it is just so much better when its legit cream cheese! 

This recipe I found on A Kitchen Addiction but definitely changed it up.  I did not add cardamom or pepper and instead of using gingersnaps (which I don't doubt would be yummy) I used Newman's Ginger-O's, which I have never had before and was quite pleased!

Ingredients: 

This recipe will make a 9" round pan.

2 cups crushed Ginger-O's
1/4 cup melted butter
16 oz cream cheese
1/2 cup brown sugar
1/2 cup sugar
3 tbsp all-purpose flour
1.5 tsp. pumpkin pie spice (or mixture of nutmeg, ginger, cloves, and cinnamon)
1.5 tsp. cinnamon
1 can (15 oz) pumpkin puree
3 eggs
2 tbsp milk

Directions:

Buy a box/package of Newman's Ginger-O's and using a food processor or man power crush them into small pieces but they should not be too fine.


Combine with melted butter and place this mixture into the base of a 9" round pan or a 9" square pan and bake for 8-10 minutes until it is turning brown.

In a mixing bowl, combine cream cheese, both sugars, and flour until smooth.  Beat in pumpkin spice and cinnamon until well combined.  Remove half of this mixture and place it aside in a spare bowl. 

Add in pumpkin puree and eggs to the other half of the mixture in the mixing bowl.


Stir in milk into the other half of the cream cheese mixture that was set aside.


Pour pumpkin mixture on top of Ginger-O's crust and dollop the cream cheese/milk mixture over it.  Using a knife swirl them together to make a cool design. 


Bake for 30-45 minutes (depending on your oven but you want the center to be set).
Cool in the refrigerator for at least 30 minutes before consuming.

Enjoy! Happy Baking and Happy Spring!

Friday, October 12, 2012

Banana, Oatmeal, Chocolate Chunk, and Reeses Bars

Let me start by saying these were gone in 24 hours.  I do live in a dorm with tons of hungry teenagers, but still, they disappeared in the blink of an eye. 


It was hard to come up with a title for these.  Technically they were made in a 9x13 pan and should be called bars.  But they were moist and had a more fluffy texture so it was more like bread than a bar.  I guess it falls somewhere it between.  

There is a plethora of wonderful ingredients in here but some of them include: oats, overripe bananas, chopped Reeses, and chocolate chips.  Can't get much better than that can it? 


After it was done baking, I melted some chocolate chips with a few tablespoons of heavy whipping cream and drizzled it over the top.  A must do.  

I am on "Fall Break" right now, which is just a few days off of school and it is quite nice to have a mental break.  I'm at Willamette University right now visiting my boy, and it's his 20th birthday next week! Because I can't be here with him on his special day we are going to make a cake together and have a pre-birthday celebration.

Back to the recipe... I made this in between classes one day and it was really simple so if you are in a crunch it's a good one to do!  I had 2 seriously overripe bananas that I'd bought and was trying to figure out what to do with them (I hate wasting food).  Breakfast muffins?  Chocolate chip muffins?  Banana bread? Smoothie?

I finally arrived at this!

This recipe was inspired (but changed a bit) by the Bon Appetit cookbook.


This was the sad last piece left!

Ingredients:

2 cups all-purpose flour
1 cup oats
1 tbsp. baking powder
1/2 tsp. salt
2 sticks unsalted butter, room temp
1 1/4 cups sugar
1 cup packed brown sugar
2 eggs
2 very ripe bananas
2 tsp. vanilla
1/2-1 cup chocolate chips
4-6 Reeses cups, chopped

Directions:

Preheat the oven to 350. 

Take two bananas that look like this:


And turn them into this: 


Mush up thoroughly with a fork until you reach a smooth consistency. 

Blend the dry ingredients in a separate medium sized bowl: flour, oats, baking powder, and salt. 

In a large mixing bowl combine the butter and sugar with an electric mixer.

Then, add both eggs, one at a time.

Beat in the banana mush mixture, followed by the vanilla.

Stir the flour mixture slowly into the wet ingredients.


Stir in the chocolate chips and Reeses cups (determine the amount yourself based on how much chocolate you want).  


Pour the mixture into a pre-greased 9x13 baking pan.  

Bake until the top is golden brown at 350 for about 35-45 minutes. 

Once they have been removed from the oven allow to cool completely.

I took some chocolate chips (about 1/4 cup) and a few tablespoons of whipping cream to reach a thin consistency and drizzled it over the top for some added oomph. 


If you like bananas and chocolate I can guarantee you will LOVE these.   

Sidenote:


I am from San Francisco and am a huge Giants fan.  The NLDS can be summed up in one word: torture.  Not only are we the first National League team to come back and win the series from an 0-2 deficit.  The Cincinnati Reds had not been swept 3 games in a row at home all season.  Let's go Giants and let's continue to kick some butt in the NLCS. 

Happy Friday and Happy Baking!


Monday, July 30, 2012

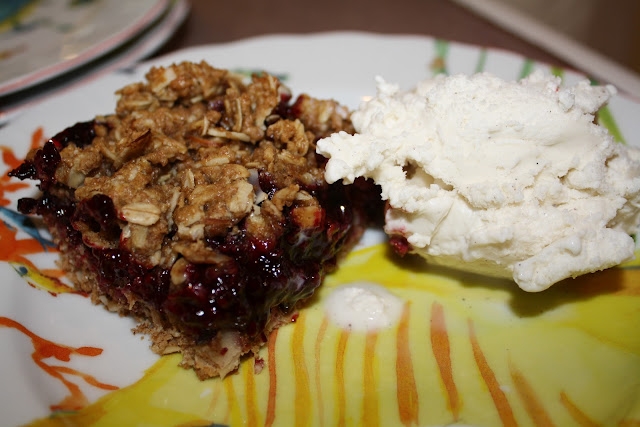
Somewhat Healthy Blackberry Oat Bars

My sister and I found an awesome spot to pick blackberries at when we went on a nice afternoon summer hike the other day.  So she decided to go back and get a bucket full of blackberries the next day.  Then, with the remaining ones that she didn't munch on, on the walk home I decided to make these!


They are SO delicious and because I worked out for an hour and a half I did not feel the least bit guilty about eating them.  They were a hit for the family as well! Hooray!

Ok so what you have to do for these is first make the blackberry filling/jam/whatever you want to call it.  


Then you make the "crust" (aka the top and bottom layers) while the filling is cooling in the fridge.  I had a great little helper in the kitchen with me!


Ingredients:

This recipe will make about 15-18 servings

For the blackberry filling:
4 cups of whole blackberries (washed)
1/2 cup granulated sugar (plus about 1 tbsp or so)
1/4 cup water
1/4 cup fresh lemon juice
2 tsp corn starch

For the "crust":
3 cups oats (for mine I used 2.5 cups oats and 1/2 cup of this honey granola and it turned out great but its totally up to you)
2 cups whole wheat flour
1 cup brown sugar
1 cup slivered almonds (feel free to use any kind of chopped nut you prefer)
1 tsp baking soda
1 tsp salt
1 tsp cinnamon
2/3 cup butter (or margarine if you prefer)
2/3 cup soy milk (I used soy milk because I have some allergies in my family but I'm sure regular milk, almond milk, etc would work out fine as well)
2 tsp vanilla

Directions:

Filling: 
First you want to measure out the lemon juice, water, and blackberries (I mashed them a little with a fork before) and put them in a medium size pot over medium-high heat.  
Let the mixture come to a boil. 
Then turn down the heat and let the mixture simmer for about 10 minutes (until blackberries are soft).  Then add the sugar and bring mixture to a boil for about 7-8 minutes.  
When you notice that it is thickening remove from heat, mix in cornstarch quickly, put it in a glass bowl (heat proof container), and place it in the fridge. 


"Crust": 
Preheat oven to 350. 
Combine dry ingredients (oats, flour, brown sugar, almonds, baking soda, salt and cinnamon) in a very large bowl. 
In a small bowl melt the butter and mix in milk and vanilla.  
Pour the wet ingredients into the dry ingredients and mix well until you have a dough-like consistency.  
Take about half of the mixture and place it into a pre-greased 12x8 pan.  Put it in the oven for about 10 minutes or until you see the top starting to slightly brown.  


Take it out of the oven, pour the chilled blackberry mixture over the first layer, and crumble the remaining crust mixture on top to get an even layer.  Place back into the oven and cook for another 15-20 minutes (the top should be browning).  


The best way to eat it is to let it cool for awhile once its been taken out of the oven but for it to still be a little warm when you cut it up (even though it's a little messy).  It's just so good warmed up! And some vanilla ice cream on the side is a must. 


Great summer dish for everyone! Hope you try it out :)