Showing posts with label cookies. Show all posts

Monday, August 26, 2013

Deconstructed S'mores

So not going to lie but I did not have a lot of faith in this recipe until it was complete. Meaning along the way I was not sure if I was doing it right but then in the end it was delicious. 


My cousin Kate sent me this recipe months ago and before I went back to school (which is where I am now) I decided to make it! My friend Chelsea helped me make it and eat it too! Love you Chels! 

I am stealing my cousins title for it which is "Deconstructed S'mores."  Basically there are 4 layers, all essential, and together equal perfection.  The bottom layer is made of Biscoff cookies (among other things), the second layer is a butterscotch layer, the third is a marshmallow layer, and the final fourth layer is dark chocolate. 

Just make these.  Take my word for it.  Specific warning on the butterscotch layer though.  I used Nestle butterscotch chips which melt in a very peculiar way.  I tried melting them in a pan and continued trying to melt them in the microwave.  It turns into this kind of chunky consistency but don't worry.  Just try to spread it out as much as you can and it will somehow all come together in the end.  It just doesn't look very appetizing in the moment of melting. 

I'm not even the biggest S'mores fan but these I could eat these all day long.  Thank you Kate so much for this recipe! I will definitely be doing it again- maybe an entire pan just for Jake. Side story: I saved my boyfriend a hefty chunk of this dessert and brought it to him on the airplane and everything and he devoured it very quickly- which is a good sign. 

Ingredients:

Cookie Layer:
- 1 package Biscoff cookies
- 2 tbsp. brown sugar
- 1 stick butter

Butterscotch Layer:
- 3/4 package butterscotch chips
- 2 tbsp. heavy cream
- 1/2 tsp. sea salt
- 1/2 tsp. cinnamon

Marshmallow Layer:
- 1.5 cups marshmallow fluff (a little more than one container)
- 1/2 tsp. cinnamon
- 1 tbsp. butter

Chocolate Layer:
- 3 cups chocolate chips (semi sweet)
- 1 tbsp. shortening
- 1/2 tsp. sea salt

*Flake salt to sprinkle on top.                                  

                                                                                                
Directions: 

1. Preheat the oven to 350.  Place the whole package of Biscoff cookies in a food processor and grind thoroughly.  Add in the brown sugar and melted butter.  Press crust ingredients into a greased 9x13 inch baking pan.  Bake for 17 minutes and cool completely.

2.  Melt the butterscotch chips with heavy cream in a saucepan.  Stir constantly.  Mix in cinnamon and salt.  Spread as evenly as possible over cooled cookie layer.  Chill in the fridge for 15-30 minutes. 

3.  For the marshmallow layer, microwave marshmallow fluff with cinnamon and butter for about 30 seconds or until liquified.  Mix with a spoon to incorporate all the ingredients together.  Pour over chilled butterscotch for 15-30 minutes.


4.  Melt the chocolate chips and butter either in a double boiler or in the microwave.  Spread the chocolate over the chilled marshmallow.  Sprinkle flaked sea salt over the chocolate.  Chill for 45 minutes to an hour.  If you don't have much time you can place in the freezer as well. 

5.  Cut up and enjoy, but always keep in the fridge when not serving or consuming! Enjoy!


Monday, June 17, 2013

Chocolate Dipped Shortbread Cookies


There is an interesting story of how these shortbread cookies came about. Sorry Willie, (my 16 year old brother) but I am going to bash on you for just a second.  So, I had just finished a long day of work and was looking forward to putting my feet up for the rest of the night when my brother calls me and asks if I can make him cookies for a bake sale the following day.  I can never say no to baking no matter how tired I am so of course I agreed. 

I thought for about 30 minutes about what was easy to make and what he could sell easily and I decided upon shortbread.  My mom makes it every year at Christmas time and it is delicious but I had never actually taking a whack at it myself, so I thought why not?

They worked out quite splendidly and though my brothers bake sale was not very successful overall I happen to think that the cookies were... and my friends who got the left overs agreed as well. 

The bake sale that my brother did was to prevent sex trafficking and to help people to escape to freedom so in the end I was happy to help out for a good cause. 


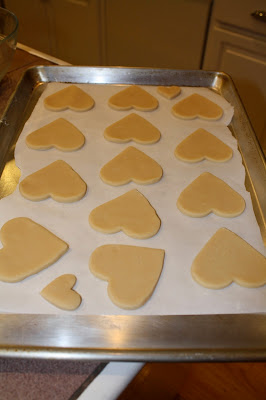
I figured that I would do heart shaped cookies because everyone can use a little love.  Especially at the end of the school year! 

Also want to mention that I got this recipe from the Joy of Baking blog!

Ingredients:

This recipe makes about 25 heart shaped cookies. 

2 cups flour
1/4 cup salt
2 sticks softened unsalted butter
1/2 cup powdered sugar
1 tsp. vanilla
3/4 cup melted chocolate chips


Directions:

1. Whisk the flour and salt together and set aside. 
2. Beat butter in an electric mixer until creamy.  Add in sugar and mix until smooth for several minutes. Mix in the vanilla extract. 
3. Gently stir in the flour mixture (you will probably have to use your hands to knead it until it has a doughy consistency). 
4. Flatten into about a 1/2 inch round shape, wrap in plastic wrap, and place in the refrigerator for about an hour.  
5. Preheat the oven to 350.
6. Roll out the dough on a flat surface while making sure there is plenty of flour to keep it from sticking to the surface and the rolling pin. 
7. Line baking sheets with parchment paper before placing cookies onto them.
8. Continue to roll it out until it is about a quarter inch thick and using cookie cutters cut out whatever shape you want.


9. Place the baking sheets containing unbaked cookies in the refrigerator directly before baking for about 15 minutes. 
10. Bake for about 8-10 minutes, or until the cookies are just turning a very light brown color. 
11. If you want to make these twice as delicious melt some chocolate chips in a glass bowl and using a knife, spatula, or dipping, paint some melted chocolate onto each cookie and set aside to allow them to cool and harden. 

Feel free to add different sprinkles or decor onto the chocolate as displayed below. 
Once they have set (or even before) dig in! 


Happy Baking as always! 

Friday, January 18, 2013

Oatmeal Peanut Butter Heath Bar Cookies

It was a late night.  I could feel the need for baking rushing through my blood.  I spotted the Heath Bar bits in my freezer, the Quaker Oats staring me in the eye from the pantry, and the smooth peanut butter not far off.  The combination was meant to be! 


I quickly looked up some sort of recipe that I could go off of to get me started but exchanged the Heath Bar for the chocolate chips that were required in this recipe: Simply Scratch.


Right now I am sitting in my living room drowning in Kleenex and wishing that I could be going for a run in this beautiful California weather.  But I can't because I have one clogged ear, two runny nostrils, and a burning throat.  To top it off I was blessed with this state while on vacation in Cabo San Lucas with my mom!  I have to return to school in 2 or 3 days and really hope I am better because flying with this monster was no fun the first time around! 

Anyways... I would love to bake right now but everyone is afraid of me so sadly I guess that won't happen until I am healthy (it's probably for the best).  

So yes, these cookies were delicious and easy and fabulous and you must try them and I am sorry for my lack of imagination today as I am not feeling very zippy. 

Here we go:

Ingredients:

2 1/2 cups of Quaker oats
1 cup all purpose flour
1/2 cup whole wheat flour
2 tsp. baking soda
1/2 tsp. salt
2 sticks unsalted butter
1 cup smooth peanut butter
3/4 cup dark brown sugar, packed
3/4 cup granulated sugar
2 eggs
3/4 tsp. vanilla
1 cup Heath Bar bits (or more if you want)


Directions:

Preheat the oven to 350.
Combine the dry ingredients in a medium sized bowl: oats, flour, whole wheat flour, baking soda, and salt.
Combine butter, peanut butter, and sugars in an electric mixer and mix until fully incorporated (a few minutes).
Add eggs one at a time followed by the vanilla.
While mixing on low speed, slowly add in the dry ingredients and mix until combined.  
Stir in Heath Bar bits.


Form round spoonfuls of cookie dough onto a lined cookie sheet and place evenly apart, allowing room for expansion. 
Press lightly down on each ball of cookie dough to flatten slightly.


Bake for 10-13 minutes and remove from the oven to allow them to cool on a rack.

Enjoy with milk while warm and gooey! Happy Baking and next time you hear from me it will most likely be from Portlandia!

Thursday, January 3, 2013

Christmas Cookies Galore!

I apologize for the fact that I am posting a Christmas cookie recipe after the holidays but I actually made these cookies on December 26th and handed them out after that so I was a little late but who cares right? They still tasted delicious!


This is pretty much just a basic sugar cookie recipe with royal icing frosting.  I had a package of royal icing that you just add water too until you reach the desired consistency.  Unfortunately it did not make very much so I also just made a lot of plain milk and powdered sugar frosting (continue to add sugar until it is thick enough). 


My mom, my sister and I spent the whole night making these and it was quite fun and quite the project! We had a variety of cookie cutters such as snowflakes, Christmas trees, Santa Claus, birds, bells, hearts, candy canes, gingerbread men, and more!

                               
I used Ziploc bags for piping and had a different bag designated for each color.
Tip: If you are going to do multiple layers of color (which most cookies do have), first outline the cookie, fill it in several minutes later, and allow this base color to dry most if not all the way before moving on to secondary colors.

     
Feel free to search the internet to get inspired, use sprinkles, create unique colors, and use your imagination!


I am just going to provide a sugar cookie recipe and provide you with this great royal icing recipe from the blog Bake at 350: Royal Icing.  My mom has been making these cookies since I was a little girl so it is definitely a family recipe that will be passed down.

Ingredients:

3 cups all-purpose flour
2 tsp. baking powder
1/2 tsp. salt
1 stick unsalted butter
1.5 cups sugar
2 eggs
2 tsp. vanilla


Directions:

Preheat the oven to 350.
Combine dry ingredients in a small bowl: flour, baking powder, and salt.
Cream butter and sugar in a mixing bowl with an electric mixer and once it is thoroughly combined add eggs and vanilla.
Slowly add the dry ingredients until blended.
Divide the dough in half and roll out each one between 2 sheets of parchment paper to form a 15' x 11' rectangle about 1/8-1/4 inch thick. Refrigerate until firm.
Remove dough from parchment paper and cut out desired shapes.
Bake on cookie sheets lined with parchment paper.
Baking time varies based on cookie thickness and size so try to bake cookies of apprx. the same size together.  Remove from the oven when the edges begin to turn golden brown.  

Let them cool completely and then go ahead with your decorating!  
These cookies can be used for any occasion, it does not have to be for Christmas... I hope you try them regardless! 

Happy New Year and Happy Baking!

Saturday, December 29, 2012

Peanut Butter Hershey's Kiss Cookies

These peanut butter chocolate cookies are decadent and so ridiculously easy.  Only 4 ingredients are needed: peanut butter, sugar, eggs, and Hershey's chocolate kisses.  No flour, no baking powder, no hassle.  


I could not believe it when I saw the recipe but my boyfriends mom insisted she had made them plenty of times and that they come out delicious.  This could not be more true! 

You have to try these.  They take 10 minutes at the most to create and only 10 more to bake! And they taste amazing right out of the oven with the melted warm chocolate.  They disappeared so fast and I am already craving more already.

I hope everyone is getting ready for the new year, 2013 here we come!

Again, I want to acknowledge that I got this recipe from my boyfriends mom, Sharon, so she receives worthy credit. 

Ingredients

This makes 35-40 peanut butter chocolate cookies.


2 cups granulated sugar
2 eggs
2 cups creamy peanut butter
35-40 chocolate Hershey's kisses 


Directions: 

Preheat the oven to 350.  
Mix together using a wooden spoon or spatula the sugar, eggs, and peanut butter until full combined.
Roll the dough into 1-inch balls and place spread apart onto 2 ungreased nonstick cookie sheets. 
Bake in the oven for about 10 minutes, or until the edges start to turn a light golden brown color. 
Remove from the oven and immediately place the Hershey's kiss into the center of the cookie.  (Make sure to insert it far enough in so that it is secure but not so that it goes all the way through)
Enjoy and consume while warm, mmm mmm good!

I told you it was easy! A must try holiday treat to bring forth the New Year! Hope you are all having a wonderful weekend. 

Happy baking! 

Wednesday, December 5, 2012

Cookies and Cream Cake

Most people love Oreo's don't they?  "Cookies and cream" brings me back to when I was a little kid because I used to love the ice cream flavor more than anything. 

It was two of my friends at school, Rachelle and Jordan's, birthdays over Thanksgiving break so I figured that when we came back to school I could make them something scrumptious! 


Believe it or not, this is a Cookies and Cream birthday cake and it was quite delicious if I may say so myself. 

The recipe entails the following: dark chocolate cake, Oreo cream cheese frosting filling, a buttercream coating, as well as chocolate whipped cream and Oreo's for decor. 


I have been so busy lately with school work and finals are coming up in about a week and a half so even having time to make this cake was a miracle.  I'm so happy I did though!  It's amazing how just sitting in the common room for an hour with a cake can make it vanish so quickly. 

My amazing boyfriends mom, Sharon, gave me a cute apron a few months ago with a cupcake pattern on it... 


Isn't it adorable? Thanks Sharon!

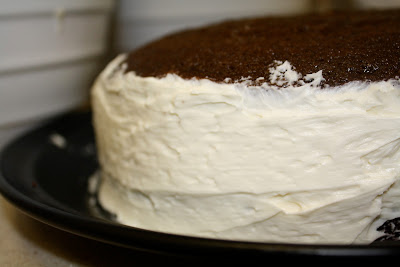
The decoration of this cake can be done in any way you like but I will explain what I did. After the buttercream frosting had set I chopped up a bunch of Oreos into fine crumbs and coated just the top of the cake with them.  Then with the remaining Oreos I had a cut them eat into half circles and placed them around the base of the cake.  Lastly, I piped the chocolate whipped cream both around the perimeter of the face of the cake and between the Oreos around the base.  I also added a heart on the top with my left over buttercream.  There are many ways that you could go about decorating this so be creative and have fun with it! 


Ok now that your mouth is watering I can give you the recipe... and I would like to acknowledge The Dainty Chef and Cooking Classy for inspiring me to make this wonderful creation.

Ingredients:

This recipe makes a regular sized 2-layer cake.

For the chocolate cake:
1¾ cup all-purpose flour
⅔ cup cocoa powder
1½ tsps. baking soda
½ tsp. baking powder
½ tsp. salt
¾ cup butter (this is one and a half sticks)
1½ cups granulated sugar
1 tsp. vanilla
3 eggs at room temperature
1¼ cups buttermilk


For the Oreo cream cheese filling:
4 ounces soft whipped cream 
1/2 cup soft unsalted butter
2 cups powdered sugar
5-7 chopped Oreos

For the buttercream:
3 sticks salted butter
4 cups powdered sugar
3-4 tbsp. heavy whipping cream
1½ tsp. vanilla 

For the chocolate whipped cream (This recipe makes a lot):
Approximately 1 cup of heavy whipping cream
Chocolate chips

*Note: Also need Oreo's for decoration (1 package is enough for the whole recipe)


Directions:

For the chocolate cake: 

Preheat the oven to 350.  Pre-grease and flour 2 8-inch round cake pans.  Make sure that you put a good amount of flour because I had a hard time getting my cake out. 
In a medium bowl combine dry ingredients: flour, cocoa powder, baking soda, baking powder, and salt. 
In a larger bowl, using an electric mixer, combine butter, sugar, vanilla, and eggs (1 at a time).  
On low speed, mix in the flour mixture, alternating with buttermilk (start and end with flour mixture). 
Divide batter amongst the 2 pans and bake for 30-35 minutes or until toothpick comes out clean.  Let cool completely before attempting to remove from the pans. 


For the Oreo cream cheese filling: 
Beat, with an electric mixer, the cream cheese and butter until smooth.
Gradually add powdered sugar and mix until very well combined.  
Stir in chopped Oreo's (not finely chopped). 
Once cake layers have cooled, spread the filling on top of one of the layers, and place the second layer over. 


For the buttercream frosting: 
Beat butter with an electric mixer until it turns a white color (at least 5 minutes). 
Slowly add in powdered sugar, heavy whipping cream, and vanilla until well combined and retains a thick consistency. 
I decided to use salted butter because it makes the sweetness not as intense and creates a perfect balance. 
Spread over the sides and top of the cake. 


For the chocolate whipped cream (optional):
Take a generous amount of heavy whipping cream and whip with an electric mixer.  
Slowly add in about a half cup of melted chocolate chips (this will be up to you on how much you want to add).  Keep whipping until it is thick enough to pipe. 
This recipe makes a lot of whipped cream so you can use it to put in hot chocolate or anything you want!


Putting it all together: 
As described above, I put crumbled Oreo's on the top, half-Oreo's around the base, and piped the whipped cream all around.  Get inspired by these pictures or come up with ideas of your own! 

Here is a picture of one of the pieces of cake... mmmm I miss it already.


Happy Birthday Jordy and Shelly! Love you guys!


This cake does have a lot of moving parts but they all come together very nicely and it is well worth all the work! 

Happy Christmas season and Happy Baking!


Friday, September 28, 2012

Timeline Birthday Cake

So I actually made this awhile ago, for my Mom's 50th birthday last year but I wanted to share it with you all! This post is going to be more about the decorating techniques than the recipe itself, so stay tuned if you are interested.


You can use any kind of cake, but my Mom is a chocoholic so I made a devils food cake with a rich chocolate buttercream.  But for the purpose of this experiment lets say use your favorite cake and frosting. 

I wanted this cake to be really special so I got photos from all different times in my Mom's life: childhood, teenage years, marriage, each of my siblings being born, and present day.  


From left to right: her and her siblings when they were little, my grandpa with my mom and aunt, and my gorgeous mother at her engagement party. 


From left to right: my parents wedding day, me and my mom, and my brother and my mom.


From left to right: my sister and my mom, and our family with my dogs puppies!

If you decide to make this cake for someone, just try to think of defining moments in their life and/or people who are very important to them.  

What you will need:

- cake/frosting
- log cookies for the circumference of the cake
- toothpicks
- tape
- pictures or printed photos
- sprinkles (I used these light pink pearl candies)
- ribbon
- a birthday boy/girl!

Procedure (sounds like a science experiment?):

1.  Frost the cake with a thick layer of your frosting of choice and put it the fridge to set for 20-30 minutes.  
2.  Place the log cookies along the edge of the cake vertically until you cover all sides.  These cookies can be bought at any grocery store but I honestly cannot remember the name! They come in a big tin and shouldn't be too hard to locate.  They also come in vanilla and chocolate filled versions.  I broke them up into varying sizes for effect but that is your decorative call.
3.  To prepare the pictures, I printed them out from my color printer and attached them to a toothpick by taping the toothpick to the backside of the picture.  If I had more time I probably would have made the pictures double-sided so that the toothpick was not visible but I was in a crunch.
4.  Evenly place the toothpicks around the cake (with photos pre-attached) as seen above.
5.  Optional: Some sort of decorative feature in the center.  I put a big heart of pink pearl candies but you can do writing, sprinkles, etc.
6.  Tie a big bow around the cake to make it look like a present! 

Hope you try this out! It meant a lot to my Mom and I'm sure it will have an impact on whoever you want to make it for!  If you have any questions as always, let me know.

Happy baking!

Thursday, August 23, 2012

Brown Butter Chocolate Stuffed Heath Bar Cookies

So, these are the famous Brown Butter Chocolate Stuffed Heath Bar cookies from the blog, How Sweet It Is.  I've never even made brown butter before and I was successful on my first try!  Not too difficult... but worth it because it makes all the difference.  Not to mention that browning butter makes the kitchen smell like heaven.


From this picture you can clearly see that it really is "chocolate-stuffed" and it is ohhhh so good.  Yet another Heath Bar recipe! If you read my Yellow Heath Bar Cake Recipe you will see my rant about how I accumulated so much heath bar.  But you can never have enough, so it's definitely not a problem.


The countdown is officially on.  I have four days until I leave for Lewis & Clark College!  For those of you who don't know it is a small liberal arts school right outside of Portland, OR.  I am experiencing an entire slew of emotions: fright, excitement, nervousness, sadness, along with anything and everything else you could possibly imagine.  One of my biggest fears is that I won't be able to continue my baking!!  I am sure I will find a way though, because it's something I'm not sure I could live without.  I bought a hand mixer, a couple large bowls, and some of the other essentials.  There's also a baking club so thats something I will look further into.

Random fact: when I was halfway through making the cookies I realized I only had one egg, so I had to walk over to my friendly neighbors house at 9pm and ask for another egg!

And now I am ranting so you probably just want the recipe, am I right? Well, here you go.

Ingredients:

This recipe will make about 18-20 medium sized cookies


1.5 sticks or 12 tablespoons of unsalted butter
1 cup light brown sugar
1/2 cup granulated sugar
1 egg + 1 egg yolk
2 tsp. vanilla
2 cups + 2 tbsp all-purpose flour
1/2 tsp. baking soda
1/4 tsp. salt
1 cup of chopped Heath Bar or toffee bits

chocolate chunks (I chopped up a bar of Trader Joe's dark chocolate truffle, which not to mention is to die for)

Directions:

Preheat the oven to 325 degrees.


Place the butter in a pan over medium heat.  Whisk until butter melts and continue to whisk until you start to see brown bits appearing at the bottom of the pan.  When this occurs, immediately remove it from heat and let cool for about 10 minutes. 


Once the butter has cooled, whisk in both sugars (brown and granulated) in a large bowl and mix until it is combined.  Do not expect it to be very smooth at first.  It will be grainy and crumbly.


Add egg and egg yolk.  Mix well and it should start to come together more.  Next, add vanilla and mix until well combined.


Combine dry ingredients in a separate medium sized bowl: flour, baking soda, and salt.
Place the dry ingredients into the large bowl with the wet mixture and mix until a dough forms (this may take a little bit of patience). 


Roll a little ball of cookie dough onto a pre-greased cookie sheet. 


Place a chunk (or 2 depending on your liking) of chocolate on top of the first piece of cookie dough.


Roll out another ball of cookie dough about the same size, place on top, and push down and seal the sides (not pictured) to flatten the cookie dough slightly so that it is able to bake more evenly. 


Bake in the oven at 325 for about 15-20 minutes.
Remove, and let cool off on a cooling rack for the desired amount of time. Enjoy!


I will definitely be making these again!  Cookies are always quick and easy, yet just as satisfying.  Thanks for the growing support and be sure to come check back in the next couple of days for something new! Always open for suggestions, recommendations, questions, etc.! 

Happy baking!