Showing posts with label chocolate chips. Show all posts

Wednesday, October 7, 2015

Pumpkin Chocolate Chip Cookies (Dairy Free)

So another year has gone by and I have not posted anything on my blog.  It's probably the wrong time to attempt to start things up again but here it goes! Amongst mid terms and my last semester of college I may be jumping the gun but don't blame me for trying.  I'm entering the time of my life where I must start attempting to figure out what the heck I'm doing with my life and wow is it overwhelming.  I've got my head on straight and am taking things one day at a time with no rush to have a concrete plan. 

And one of my favorite times of year is upon us.  The leaving are changing colors and making there way to the pavement.  The rain should be coming soon and it's no longer ghastly hot outside.  With fall comes pumpkin everything which I never complain about.  Trader Joes is my favorite place to shop this time of year because they have everything from pumpkin ravioli, to pumpkin cream cheese, to candied pumpkin seeds.  I just can't get enough of it! And as I read my last blog post it is not so different from this one... raving about fall, what can I say!


So of course with the pumpkin frenzy I had to make something of my own.  Pumpkin cookies with chocolate chips, couldn't leave that second part out could I?? I didn't take pictures during the process of making these cookies but they are so easy that I'm sure you won't have any problems!

First off I want to acknowledge a new blog I've found called Two Twenty One where I found this amazing recipe that I will be using year round now that I've discovered it. 

There's really not many tips I can give for this recipe because it was just so straight forward and easy. One thing that I did tweak was that the recipe only calls for cinnamon and I used pumpkin pie spice instead which gave it that extra oomph but totally up to you. 

Ingredients:

This recipe makes 18-24 cookies. 

1/2 cup vegetable oil 
1 cup pumpkin puree 
1 cup sugar
1 egg
1 tsp. vanilla
1 tsp. baking soda
1 tsp. milk (I used almond)
2 tsp. pumpkin pie spice (or cinnamon)
2 tsp. baking powder
1/2 tsp. salt
2 cups flour
1.5-2 cups chocolate chips 


Directions:

1.  Preheat the oven to 350 degrees.
2.  In a medium bowl, combine oil, pumpkin, sugar, egg, and vanilla and whisk until combined.
3.  In small bowl combine baking soda and milk and stir into pumpkin mixture. 
4.  In another medium bowl, combine spices, flour, baking powder, and salt. 
5.  Combine pumpkin mixture and dry ingredients until uniform. 
6.  Fold in chocolate chips to desired amount. 
7.  Place dollops of cookie dough onto pre-greased cookie sheet (no need to space out a lot, I didn't find they expanded outwards much). 
8.  Bake for 12-13 minutes, allow to cool, and enjoy! 

Happy baking y'all!! 

Monday, June 17, 2013

Chocolate Dipped Shortbread Cookies


There is an interesting story of how these shortbread cookies came about. Sorry Willie, (my 16 year old brother) but I am going to bash on you for just a second.  So, I had just finished a long day of work and was looking forward to putting my feet up for the rest of the night when my brother calls me and asks if I can make him cookies for a bake sale the following day.  I can never say no to baking no matter how tired I am so of course I agreed. 

I thought for about 30 minutes about what was easy to make and what he could sell easily and I decided upon shortbread.  My mom makes it every year at Christmas time and it is delicious but I had never actually taking a whack at it myself, so I thought why not?

They worked out quite splendidly and though my brothers bake sale was not very successful overall I happen to think that the cookies were... and my friends who got the left overs agreed as well. 

The bake sale that my brother did was to prevent sex trafficking and to help people to escape to freedom so in the end I was happy to help out for a good cause. 


I figured that I would do heart shaped cookies because everyone can use a little love.  Especially at the end of the school year! 

Also want to mention that I got this recipe from the Joy of Baking blog!

Ingredients:

This recipe makes about 25 heart shaped cookies. 

2 cups flour
1/4 cup salt
2 sticks softened unsalted butter
1/2 cup powdered sugar
1 tsp. vanilla
3/4 cup melted chocolate chips


Directions:

1. Whisk the flour and salt together and set aside. 
2. Beat butter in an electric mixer until creamy.  Add in sugar and mix until smooth for several minutes. Mix in the vanilla extract. 
3. Gently stir in the flour mixture (you will probably have to use your hands to knead it until it has a doughy consistency). 
4. Flatten into about a 1/2 inch round shape, wrap in plastic wrap, and place in the refrigerator for about an hour.  
5. Preheat the oven to 350.
6. Roll out the dough on a flat surface while making sure there is plenty of flour to keep it from sticking to the surface and the rolling pin. 
7. Line baking sheets with parchment paper before placing cookies onto them.
8. Continue to roll it out until it is about a quarter inch thick and using cookie cutters cut out whatever shape you want.


9. Place the baking sheets containing unbaked cookies in the refrigerator directly before baking for about 15 minutes. 
10. Bake for about 8-10 minutes, or until the cookies are just turning a very light brown color. 
11. If you want to make these twice as delicious melt some chocolate chips in a glass bowl and using a knife, spatula, or dipping, paint some melted chocolate onto each cookie and set aside to allow them to cool and harden. 

Feel free to add different sprinkles or decor onto the chocolate as displayed below. 
Once they have set (or even before) dig in! 


Happy Baking as always! 

Wednesday, June 12, 2013

Double Chocolate Heath Bar Cookies with Salted Caramel

This cookie is very multifaceted because not only does it have chocolate chips and cocoa powder but it has toffee/heath bars bits as well, not to mention the salted caramel drizzled on top! 


Baking is sort of an addiction of mine.  When I get hooked on the fact that I want to bake something it will most likely happen. I had several little bumps in the road while making these cookies like randomly having no baking soda and scootering down to my neighbors who graciously gave me some.  Of course I returned the favor by giving her a plate of cookies! Another was that I barely had any caramel so only about half of the cookies had it which is fine because it isn't totally necessary but gives it some extra oomph. 

This summer has been great so far, I have a perfect balance between baking, blogging, working, free time, time with friends and family, etc.  I am excited to hopefully start volunteering at an animal shelter sometime soon as well. 

If you have a history with me you know that I like Heath Bar, especially because my boyfriend gave me pounds of it 2 years ago... which is now almost gone, this is the last bag: 


I guess this is going to be good for me though because I will need to expand beyond the world of Heath bar deliciousness! Anyways hope you enjoy this recipe which was inspired by Center Cut Cook.

Ingredients:

This recipe makes about 4 dozen cookies. 

2 sticks of unsalted softened butter
1.5 cups sugar
2 eggs
2 tsp. vanilla
2 cups flour
2/3 cups cocoa powder
3/4 tsp. baking soda
1/4 tsp. salt
1 cup chocolate chips
1 cup heath bar bits

*Optional: salted caramel for topping


Directions: 

1. Preheat the oven to 350 degrees. 
2. With an electric mixer combine softened butter and sugar until it appears creamy. Add in eggs and vanilla and mix again until combined. 
3. In a large separate bowl combine flour, cocoa powder, baking soda, and salt. Mix the dry ingredients into the wet with a spatula. 
4. Fold in the chocolate chips and toffee.


5. Roll the cookie dough into balls and space evenly apart on a baking sheet.  It is recommended to leave about 1.5-2 inches of space between each dough. 


6. Bake for about 8-10 minutes, remove from the oven, allow to cool a little on the sheet, and finally transfer onto a cooling rack. 
7. While they are cooling drizzle the salted caramel onto each cookie.  

Serve and enjoy!


Happy baking everyone!

Monday, June 3, 2013

Nanaimo Bars

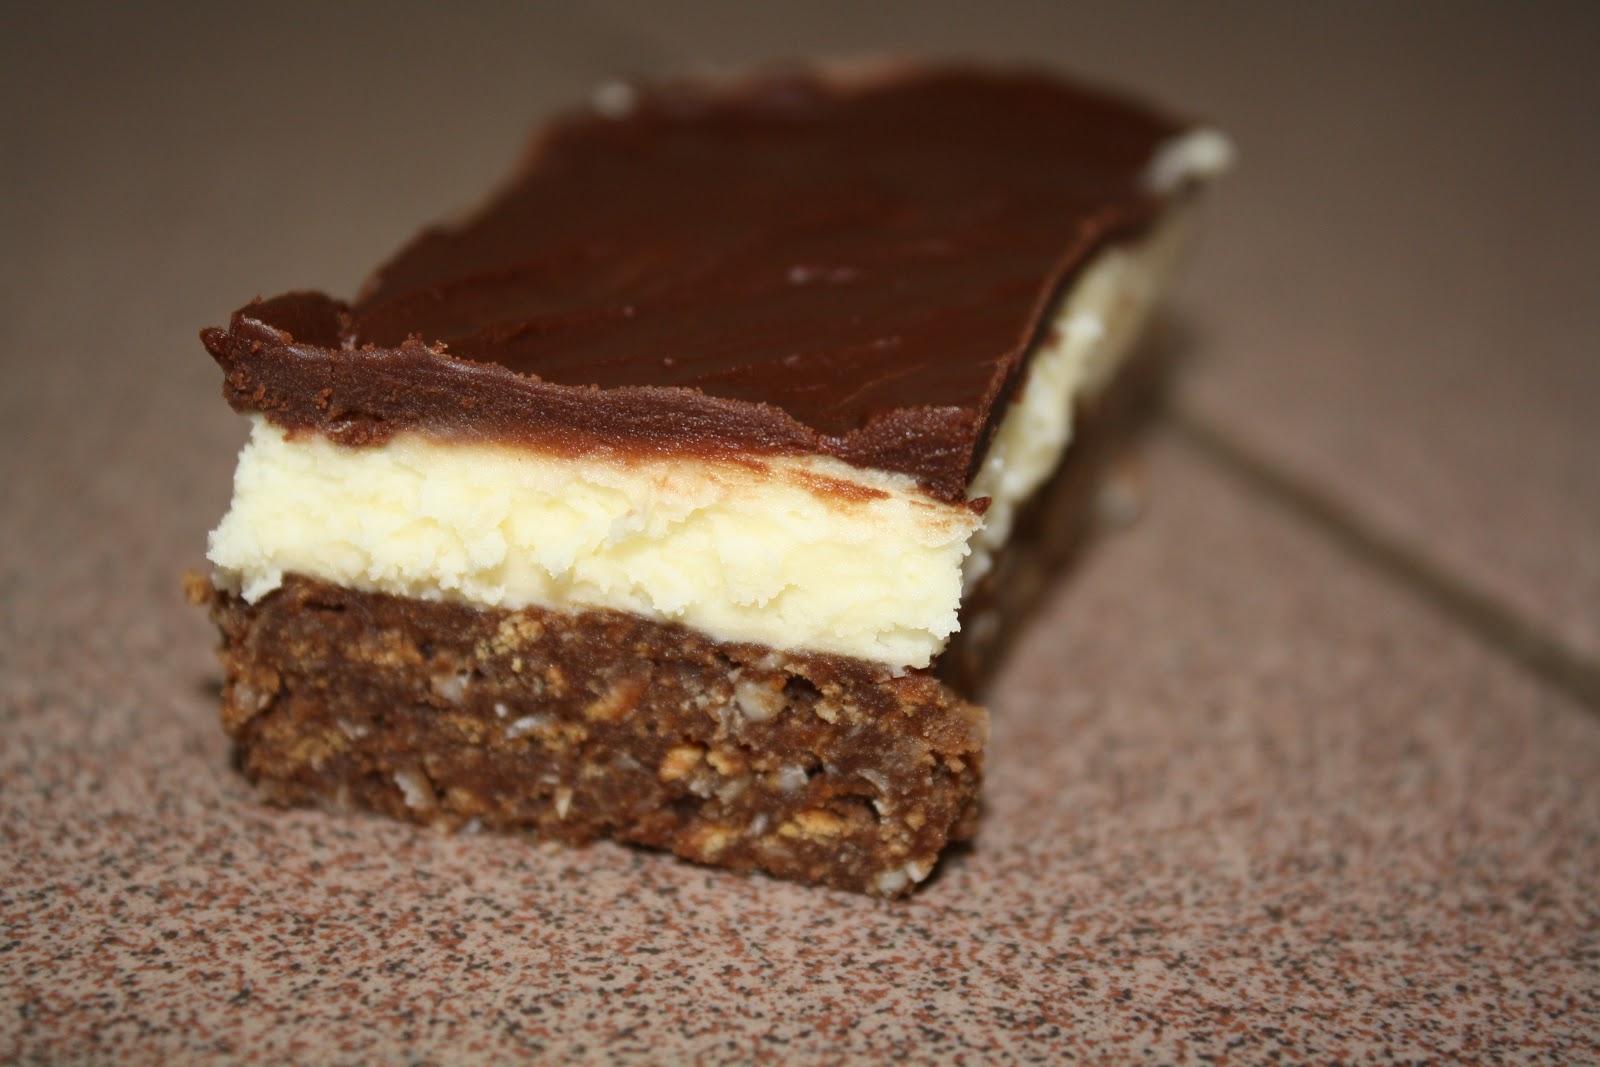
Most of you have probably never heard of these so called, Nanaimo bars, but now that you know what they are there is no turning back!  They are rich, creamy, and decadent... enough said!


Basically these consist of three different layers.  The bottom layer is mostly made up of coconut, graham cracker, pecans or almonds, and cocoa powder.  The middle layer is creamy made with heavy whipping cream, butter, pudding mix, and powdered sugar.  The top layer is the most simple but brings it to completion: chocolate and butter.  

When I was at school last semester my friends mom made some of these for him one day and I tried them.  I had never had them before and I really enjoyed them so I figured that once I got home I would try to make them myself.  With having no clue what they were made out of I referred to one of my favorite blogs, Cooking Classy, to begin my adventure. 


My mom called on my baking "expertise" to make something to bring to my brothers lacrosse banquet and I thought it would be the perfect opportunity to give it a shot.  I had to hope that it would all work out because I did not have the time for it not to.  Luckily it did, and now I get to share it with you all!  Another awesome thing about this recipe is that you don't have to bake anything all you do is prepare it and its pretty much ready to eat!

Update: I am loving summer and can't get enough of this beautiful weather.  I am working 2 hostess jobs to make some money but I am trying to have a fare amount of relaxing as well.


Ingredients:

This recipe makes about a 9"x14" pan of bars. 

Base layer: 
1 cup diced salted butter
2/3 cup brown sugar
6 tbsp. cocoa powder
2 eggs, beaten
3 tsp. vanilla
3.5 cups graham cracker crumbs
1.5 cups shredded sweetened coconut
1 cup finely chopped almonds (or pecans)

Middle layer:
2/3 cup softened salted butter
1/2 cup heavy whipping cream
4 tbsp. vanilla pudding mix 
4 cups powdered sugar

Top Layer: 
1 cup semisweet chocolate chips
4 tbsp salted butter

Directions:

Base layer:
Melt butter in saucepan over medium heat.  Once melted, remove from heat and add in brown sugar and cocoa powder until fully combined. 
Continue whisking and while doing so, add in the 2 beaten eggs and combine. 
Return to heat for several minutes until it has thickened.  Stir in vanilla once removed from heat. 
Using a food processor, make the designated amount of finely chopped graham cracker, shredded coconut, and almonds.  I made all of these ingredients pretty fine but it is technically up to you if you want it to be more crunchy!  The picture below is the almonds. 


Once you have combined the graham cracker, coconut, and almonds in a large glass bowl, pour in the chocolate mixture and using a spatula mix until fully coated. 


Press this into a even layer in a pre-greased pan, cover, and place in the freezer for 15-20 minutes. 

For the middle layer:
Using an electric mixer combine butter, heavy whipping cream, and pudding mix for several minutes until smooth and creamy.  
Add in powdered sugar and beat slowly until fully incorporated. 
Spread mixture in an even layer over the base layer, cover, and freeze for 10-15 minutes. 


For the top layer: 
Melt chocolate chips and butter in a heatproof bowl either in 30 second intervals in the microwave (with stirring in between) or over a pot of boiling water. 


Spread this evenly over the preceding two layers of the bars, cover, and refrigerate until ready to eat!
These should definitely be cold right up until the time they are served or else they start to melt pretty quick!  Not the type of dessert that should be left out for awhile! 


These are a new, hip, modern dessert that will not disappoint.  Even my mom who hates shredded coconut liked them!  I hope you try these out and that you are having a great start to the new month of June! 

Happy baking!

Wednesday, April 24, 2013

Oatmeal Peanut Butter Banana Sandwiches

Hello again, friends of the baking community! It's been awhile, I know, and I wanted to give you an extra special gift for being patient! These are oatmeal peanut butter cookies, that happen to be gluten free, made into a sandwich that has pureed frozen banana in the center. 


I was not looking for a gluten free recipe but I came across this one which is lower in fat content and has no flour so I decided to try it out!  Be careful not to overcook these as they will get a weird consistency after cooling down but still yummy nonetheless. 

To update you on my life I have about one more week of classes, finals, and then I am finally headed home for a nice long summer which I am so excited about!  It has also been gorgeous weather in Portland, which is hard to believe, but it is so hard to sit inside and study when it is 75 degrees out!

My friends and I are huge Pinterest people and love to freeze pieces of frozen banana, throw them into the food processor or blender, and make it into a creamy ice cream that has just one ingredient: the bananas themselves! 

Beware: if cookies are just out of the oven they will be impossible to resist and sandwiches will be very messy.  So bring plenty of napkins. 

I used the peanut butter oatmeal chocolate chip cookies recipe from Ambitious Kitchen, which you guys should check out if you are interested. 

Ingredients:

This recipe makes 15-20 cookies.

1 cup creamy peanut butter
2/3 cup brown sugar
1.5 tsp. vanilla
2 eggs
2/3 oats
1 tsp. baking soda
2/3 cup chocolate chips
2 sliced frozen bananas 

Directions:

1. Preheat the oven to 350.
2. In a small bowl combine oats and baking soda.
3. In a separate larger bowl mix together peanut butter, brown sugar, eggs, and vanilla with an electric mixer.  Then, add the dry ingredients and chocolate chips and mix until combined.


4. Roll into 1.5 inch balls and place 2 inches apart on a cookie sheet.  Press down lightly to flatten slightly before placing in the oven for 9-11 minutes.  Remove when the edges start to turn golden brown. 


5. While your cookies are baking, make the banana puree.  You should already have 2 frozen sliced bananas that have been in the freezer for at least 4 hours.  Place in a food processor and blend until creamy! 


6. Place between 2 cookies and INDULGE! 

These are not difficult at all so I hope you try it out and make again! Happy baking! 

Friday, February 8, 2013

Rocky Road Brownies

First of all I am SO sorry that I have not posted in about 3 weeks, I have just gotten back into the rhythm of school and readjusting to college life- my apologies.  But this is worth the wait! They are Rocky Road brownies.  A light cakey brownie with marshmallows, chopped pecans or walnuts, and chocolate chips. 


I spontaneously made these two nights before I left home, I knew I needed one last hoorah before my baking days would soon be limited.  They take basically no time at all if you have the ingredients handy.

Another note: The brownies will probably take longer or shorter than indicated depending on your oven and they will still seem a little of gooey when you take them out.  Keep in mind that this is due to the marshmallows that you have added.  Once it is removed from the oven let it cool and it should solidify nicely. 


I am happy to see that I am continuing to gain more and more views and interest via Pinterest, Google, and Facebook so thank you so much to all of my supporters who have helped me along the way and continue to check in with "Ever So Sweet" on a regular basis.  You guys are so awesome!

I never actually was much of a fan of Rocky Road ice cream... shoot me now, I know.  I was more of a cookie dough or mint chocolate chip kind of gal but nevertheless I will not argue with these brownies.  Especially with a scoop of vanilla ice cream on the side they are quite marvelous.


Ingredients:

This recipe makes one 9x9 square of brownies. 

4 ounces unsweetened chocolate
1 stick unsalted butter
1/2 cup + 2 tbsp. all-purpose flour
1/4 tsp. baking powder
3 eggs
1 1/4 cups granulated sugar
1/4 tsp. salt
35-50 mini marshmallows
1/2 cup chocolate chips
1/2 cup chopped walnuts or pecans

Directions: 

Start off my preheating the oven to 350 and lining your 9x9 square pan with aluminum foil.
Melt 4 oz. of chocolate and butter in the microwave in 30 seconds intervals, stirring in between.
Whisk the flour and baking powder together in a separate bowl small bowl.
In an electric mixer combine eggs, sugar, and salt.  Beat on high speed until it turns thick, pale yellow, and has increased a decent amount in volume (about 2-3 minutes). 
Pour in the butter/chocolate mixture and fold in with a spatula. 
Sift the flour mixture in, while folding again with the spatula and being careful not to overmix.
Pour the batter into the foil lined pan.


Distribute the chopped walnuts (or pecans), chocolate chips, and mini marshmallows over the surface.  


Poke the mini marshmallows into the batter with a fork or finger so that just the top is visible. 
Bake 25-35 minutes (make sure to keep an eye on this before you reach the time limit, a toothpick inserted should come out cooked but not necessarily clean).
Once it is done cooking, allow to cool completely before cutting and consuming!

This recipe was developed from a cookies, bars, and brownies cookbook that my Aunt gave me for the holidays- very sweet of her!

Enjoy your weekend and Happy almost Valentines Day! 
P.S. Happy Baking!

Saturday, January 5, 2013

Kahlua Chocolate Cake

So... funny story.  My mom makes this supreme bundt Kahlua chocolate cake every time the holidays come around.  She makes it for my siblings' teachers, friends, and our family! About a year and a half ago we adopted a second Guide Dog breeder, whose name, believe it or not, is "Kahlua." She is such a sweetie pie and now this cake that is made every year has an even deeper correlation with our family.


I have always just eaten this cake... this year I actually learned how to make it! It's super easy and probably only takes about 15 minutes because it is the glorifying of cake mix. 

Make sure you have a good bundt cake pan and once you remove the cake from the oven you must wait for it to cool before dumping the cake out because it can turn very messy very quickly. 


Also: don't forget to spray it with nonstick cooking spray to ensure your creation gets out safely! 
I know that many people have heard of or have had this cake, but now you can make it on your own. 


One of the reasons it is so yummy is that it has 3/4 cup of Kahlua.  My little 10 year old sister saw the cake sitting in the kitchen and said, "Darn! I can't have any!" and I replied with a "Why not?" and she said "Because it has alcohol in it!" But do not fret because anyone can have this at any age as the alcohol cooks out but leaves the flavor for your enjoyment. 

Ingredients: 

This recipe makes one Kahlua chocolate bundt cake.

Devils food cake mix
1 cup sour cream
4 eggs
3/4 cup vegetable oil
3/4 cup Kahlua
1 cup of chocolate chips


Directions: 

Preheat the oven to 350 degrees. 
In an electric mixer combine cake mix, sour cream, 4 eggs, vegetable oil, and Kahlua.  Mix on low until well combined and then on medium-high for several minutes until it becomes a lighter color and has a fluffy texture (2-3 minutes).
Fold in the chocolate chips.
Bake for about 45 minutes at 350 degrees. 
Remove from the oven and allow to cool completely.

I know I forgot to do this for my pictures but remember to sprinkle with powdered sugar!

Make this cake. Just trust me on this one, you will not regret it. 

Happy Baking everyone!

Wednesday, December 5, 2012

Cookies and Cream Cake

Most people love Oreo's don't they?  "Cookies and cream" brings me back to when I was a little kid because I used to love the ice cream flavor more than anything. 

It was two of my friends at school, Rachelle and Jordan's, birthdays over Thanksgiving break so I figured that when we came back to school I could make them something scrumptious! 


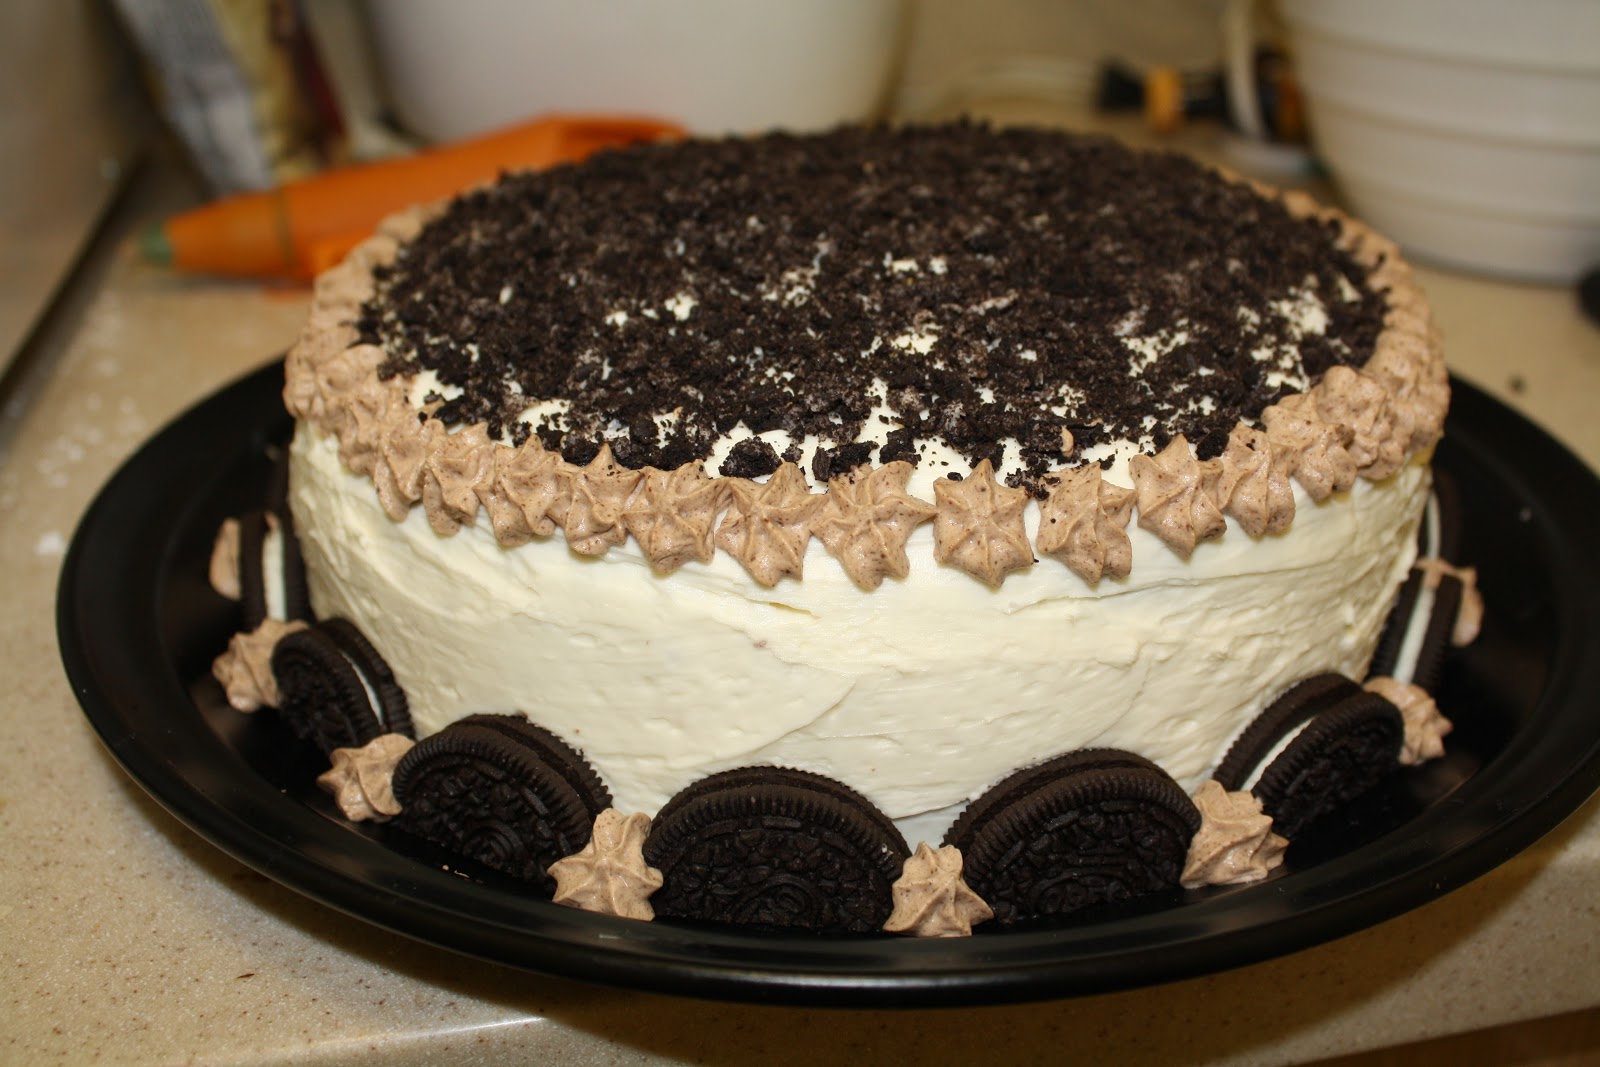
Believe it or not, this is a Cookies and Cream birthday cake and it was quite delicious if I may say so myself. 

The recipe entails the following: dark chocolate cake, Oreo cream cheese frosting filling, a buttercream coating, as well as chocolate whipped cream and Oreo's for decor. 


I have been so busy lately with school work and finals are coming up in about a week and a half so even having time to make this cake was a miracle.  I'm so happy I did though!  It's amazing how just sitting in the common room for an hour with a cake can make it vanish so quickly. 

My amazing boyfriends mom, Sharon, gave me a cute apron a few months ago with a cupcake pattern on it... 


Isn't it adorable? Thanks Sharon!

The decoration of this cake can be done in any way you like but I will explain what I did. After the buttercream frosting had set I chopped up a bunch of Oreos into fine crumbs and coated just the top of the cake with them.  Then with the remaining Oreos I had a cut them eat into half circles and placed them around the base of the cake.  Lastly, I piped the chocolate whipped cream both around the perimeter of the face of the cake and between the Oreos around the base.  I also added a heart on the top with my left over buttercream.  There are many ways that you could go about decorating this so be creative and have fun with it! 


Ok now that your mouth is watering I can give you the recipe... and I would like to acknowledge The Dainty Chef and Cooking Classy for inspiring me to make this wonderful creation.

Ingredients:

This recipe makes a regular sized 2-layer cake.

For the chocolate cake:
1¾ cup all-purpose flour
⅔ cup cocoa powder
1½ tsps. baking soda
½ tsp. baking powder
½ tsp. salt
¾ cup butter (this is one and a half sticks)
1½ cups granulated sugar
1 tsp. vanilla
3 eggs at room temperature
1¼ cups buttermilk


For the Oreo cream cheese filling:
4 ounces soft whipped cream 
1/2 cup soft unsalted butter
2 cups powdered sugar
5-7 chopped Oreos

For the buttercream:
3 sticks salted butter
4 cups powdered sugar
3-4 tbsp. heavy whipping cream
1½ tsp. vanilla 

For the chocolate whipped cream (This recipe makes a lot):
Approximately 1 cup of heavy whipping cream
Chocolate chips

*Note: Also need Oreo's for decoration (1 package is enough for the whole recipe)


Directions:

For the chocolate cake: 

Preheat the oven to 350.  Pre-grease and flour 2 8-inch round cake pans.  Make sure that you put a good amount of flour because I had a hard time getting my cake out. 
In a medium bowl combine dry ingredients: flour, cocoa powder, baking soda, baking powder, and salt. 
In a larger bowl, using an electric mixer, combine butter, sugar, vanilla, and eggs (1 at a time).  
On low speed, mix in the flour mixture, alternating with buttermilk (start and end with flour mixture). 
Divide batter amongst the 2 pans and bake for 30-35 minutes or until toothpick comes out clean.  Let cool completely before attempting to remove from the pans. 


For the Oreo cream cheese filling: 
Beat, with an electric mixer, the cream cheese and butter until smooth.
Gradually add powdered sugar and mix until very well combined.  
Stir in chopped Oreo's (not finely chopped). 
Once cake layers have cooled, spread the filling on top of one of the layers, and place the second layer over. 


For the buttercream frosting: 
Beat butter with an electric mixer until it turns a white color (at least 5 minutes). 
Slowly add in powdered sugar, heavy whipping cream, and vanilla until well combined and retains a thick consistency. 
I decided to use salted butter because it makes the sweetness not as intense and creates a perfect balance. 
Spread over the sides and top of the cake. 


For the chocolate whipped cream (optional):
Take a generous amount of heavy whipping cream and whip with an electric mixer.  
Slowly add in about a half cup of melted chocolate chips (this will be up to you on how much you want to add).  Keep whipping until it is thick enough to pipe. 
This recipe makes a lot of whipped cream so you can use it to put in hot chocolate or anything you want!


Putting it all together: 
As described above, I put crumbled Oreo's on the top, half-Oreo's around the base, and piped the whipped cream all around.  Get inspired by these pictures or come up with ideas of your own! 

Here is a picture of one of the pieces of cake... mmmm I miss it already.


Happy Birthday Jordy and Shelly! Love you guys!


This cake does have a lot of moving parts but they all come together very nicely and it is well worth all the work! 

Happy Christmas season and Happy Baking!