Showing posts with label chocolate cake. Show all posts

Saturday, January 5, 2013

Kahlua Chocolate Cake

So... funny story.  My mom makes this supreme bundt Kahlua chocolate cake every time the holidays come around.  She makes it for my siblings' teachers, friends, and our family! About a year and a half ago we adopted a second Guide Dog breeder, whose name, believe it or not, is "Kahlua." She is such a sweetie pie and now this cake that is made every year has an even deeper correlation with our family.


I have always just eaten this cake... this year I actually learned how to make it! It's super easy and probably only takes about 15 minutes because it is the glorifying of cake mix. 

Make sure you have a good bundt cake pan and once you remove the cake from the oven you must wait for it to cool before dumping the cake out because it can turn very messy very quickly. 


Also: don't forget to spray it with nonstick cooking spray to ensure your creation gets out safely! 
I know that many people have heard of or have had this cake, but now you can make it on your own. 


One of the reasons it is so yummy is that it has 3/4 cup of Kahlua.  My little 10 year old sister saw the cake sitting in the kitchen and said, "Darn! I can't have any!" and I replied with a "Why not?" and she said "Because it has alcohol in it!" But do not fret because anyone can have this at any age as the alcohol cooks out but leaves the flavor for your enjoyment. 

Ingredients: 

This recipe makes one Kahlua chocolate bundt cake.

Devils food cake mix
1 cup sour cream
4 eggs
3/4 cup vegetable oil
3/4 cup Kahlua
1 cup of chocolate chips


Directions: 

Preheat the oven to 350 degrees. 
In an electric mixer combine cake mix, sour cream, 4 eggs, vegetable oil, and Kahlua.  Mix on low until well combined and then on medium-high for several minutes until it becomes a lighter color and has a fluffy texture (2-3 minutes).
Fold in the chocolate chips.
Bake for about 45 minutes at 350 degrees. 
Remove from the oven and allow to cool completely.

I know I forgot to do this for my pictures but remember to sprinkle with powdered sugar!

Make this cake. Just trust me on this one, you will not regret it. 

Happy Baking everyone!

Wednesday, December 5, 2012

Cookies and Cream Cake

Most people love Oreo's don't they?  "Cookies and cream" brings me back to when I was a little kid because I used to love the ice cream flavor more than anything. 

It was two of my friends at school, Rachelle and Jordan's, birthdays over Thanksgiving break so I figured that when we came back to school I could make them something scrumptious! 


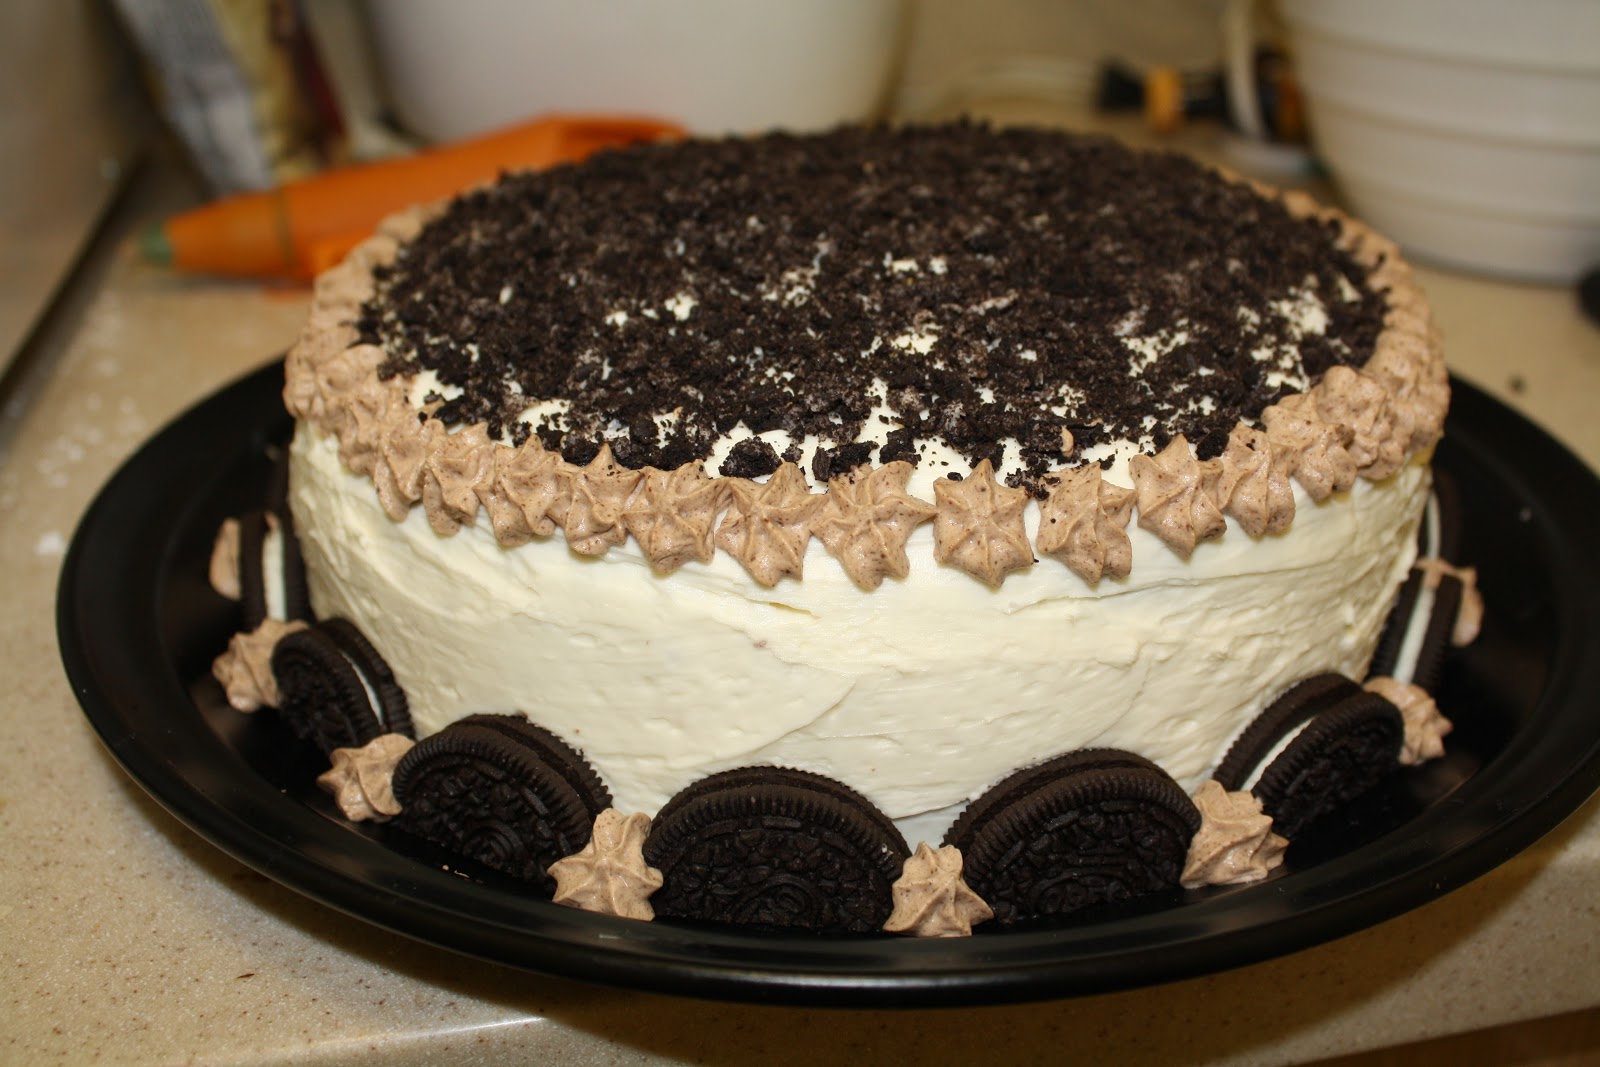
Believe it or not, this is a Cookies and Cream birthday cake and it was quite delicious if I may say so myself. 

The recipe entails the following: dark chocolate cake, Oreo cream cheese frosting filling, a buttercream coating, as well as chocolate whipped cream and Oreo's for decor. 


I have been so busy lately with school work and finals are coming up in about a week and a half so even having time to make this cake was a miracle.  I'm so happy I did though!  It's amazing how just sitting in the common room for an hour with a cake can make it vanish so quickly. 

My amazing boyfriends mom, Sharon, gave me a cute apron a few months ago with a cupcake pattern on it... 


Isn't it adorable? Thanks Sharon!

The decoration of this cake can be done in any way you like but I will explain what I did. After the buttercream frosting had set I chopped up a bunch of Oreos into fine crumbs and coated just the top of the cake with them.  Then with the remaining Oreos I had a cut them eat into half circles and placed them around the base of the cake.  Lastly, I piped the chocolate whipped cream both around the perimeter of the face of the cake and between the Oreos around the base.  I also added a heart on the top with my left over buttercream.  There are many ways that you could go about decorating this so be creative and have fun with it! 


Ok now that your mouth is watering I can give you the recipe... and I would like to acknowledge The Dainty Chef and Cooking Classy for inspiring me to make this wonderful creation.

Ingredients:

This recipe makes a regular sized 2-layer cake.

For the chocolate cake:
1¾ cup all-purpose flour
⅔ cup cocoa powder
1½ tsps. baking soda
½ tsp. baking powder
½ tsp. salt
¾ cup butter (this is one and a half sticks)
1½ cups granulated sugar
1 tsp. vanilla
3 eggs at room temperature
1¼ cups buttermilk


For the Oreo cream cheese filling:
4 ounces soft whipped cream 
1/2 cup soft unsalted butter
2 cups powdered sugar
5-7 chopped Oreos

For the buttercream:
3 sticks salted butter
4 cups powdered sugar
3-4 tbsp. heavy whipping cream
1½ tsp. vanilla 

For the chocolate whipped cream (This recipe makes a lot):
Approximately 1 cup of heavy whipping cream
Chocolate chips

*Note: Also need Oreo's for decoration (1 package is enough for the whole recipe)


Directions:

For the chocolate cake: 

Preheat the oven to 350.  Pre-grease and flour 2 8-inch round cake pans.  Make sure that you put a good amount of flour because I had a hard time getting my cake out. 
In a medium bowl combine dry ingredients: flour, cocoa powder, baking soda, baking powder, and salt. 
In a larger bowl, using an electric mixer, combine butter, sugar, vanilla, and eggs (1 at a time).  
On low speed, mix in the flour mixture, alternating with buttermilk (start and end with flour mixture). 
Divide batter amongst the 2 pans and bake for 30-35 minutes or until toothpick comes out clean.  Let cool completely before attempting to remove from the pans. 


For the Oreo cream cheese filling: 
Beat, with an electric mixer, the cream cheese and butter until smooth.
Gradually add powdered sugar and mix until very well combined.  
Stir in chopped Oreo's (not finely chopped). 
Once cake layers have cooled, spread the filling on top of one of the layers, and place the second layer over. 


For the buttercream frosting: 
Beat butter with an electric mixer until it turns a white color (at least 5 minutes). 
Slowly add in powdered sugar, heavy whipping cream, and vanilla until well combined and retains a thick consistency. 
I decided to use salted butter because it makes the sweetness not as intense and creates a perfect balance. 
Spread over the sides and top of the cake. 


For the chocolate whipped cream (optional):
Take a generous amount of heavy whipping cream and whip with an electric mixer.  
Slowly add in about a half cup of melted chocolate chips (this will be up to you on how much you want to add).  Keep whipping until it is thick enough to pipe. 
This recipe makes a lot of whipped cream so you can use it to put in hot chocolate or anything you want!


Putting it all together: 
As described above, I put crumbled Oreo's on the top, half-Oreo's around the base, and piped the whipped cream all around.  Get inspired by these pictures or come up with ideas of your own! 

Here is a picture of one of the pieces of cake... mmmm I miss it already.


Happy Birthday Jordy and Shelly! Love you guys!


This cake does have a lot of moving parts but they all come together very nicely and it is well worth all the work! 

Happy Christmas season and Happy Baking!


Friday, October 19, 2012

Dark Chocolate Salted Caramel Cake

Salted caramel is the new thing.  I had never even tried it until a few months ago and it was amazing! My boyfriends birthday was on the 17th of October so I went to visit the weekend before and made him a cake of his choice.  He very cleverly came up with this on his own... and man it was good.


Sorry for the bad photo quality... I had to use my iPhone again because I was out of town.

This is a dark chocolate cake with salted caramel icing and a chocolate ganache filling/decoration.  I recommend you make the ganache first if you decide to use it because it takes a little while to firm up.

I did have some issues with the consistency of this frosting.  It took a lot of fooling around with and for some reason it just did not want to thicken up.  I'd recommend just being prepared to add a little bit of this and that to reach the consistency you want.  The chocolate cake recipe I used for this is literally the best one I have ever had and I'm not even a huge chocolate person.  I also cheated and got store bought caramel because I didn't have time to make it but if you want to make it yourself check out my Snickerdoodle Cupcake with Caramel Filling recipe. 


Here we are with the finished product (4 or so hours later).  He was a good sport and did his homework patiently waiting for me to perfect it.  

I also made this cake at his Kappa Sigma fraternity house so it was legitimately gone in less than 24 hours.  I know where to go if I ever need happy customers.


I was inspired by the blogs Use Real Butter and Cucina Nicolina for this recipe. 

Ingredients:

This recipe makes one 2-layer cake. 

For the dark chocolate cake: 
4 oz. dark chocolate chips
2 cups all-purpose flour
2 tsp. baking soda
1/2 tsp. salt
6 tbsp. cocoa powder
1 stick of softened unsalted butter
2.5 cups brown sugar
2 tsp. vanilla
3 eggs
1/2 cup of buttermilk
1.25 cups boiling water

For the salted caramel cream cheese frosting (be prepared to have extra): 
16 oz. cream cheese (I'd recommend full fat because it will be thicker)
1/4 cup unsalted butter
8 oz. salted caramel (this is about 1 cup of caramel and about 1-2 tsp. salt depending on how much you want)
4-5 cups powdered sugar

For the chocolate ganache:
4 oz. dark chocolate 
5 oz. heavy whipping cream


Directions:

For the dark chocolate cake:
Preheat the oven to 350.
Melt the chocolate and set aside. 
Combine the dry ingredients: flour, baking soda, salt, and cocoa powder. 


In a large mixing bowl, using an electric mixer, combine brown sugar and butter.  Add the vanilla.  Then add the eggs one at a time.

Stir in the melted chocolate. 


Add half of the dry ingredients and combine.  Then add the buttermilk followed by the other half of the dry ingredients. 


Add the boiling water and mix well.  Do not worry about it's very thin consistency- that means you are doing it right!

Pour into two 9-inch cake pans and bake for 30-35 minutes in the oven. When they are done, remove from the oven, and allow to cool completely. 

For the salted caramel cream cheese frosting:
Beat butter and cream cheese with an electric mixer until combined.
Mix in the salted caramel. 


Add the powdered sugar slowly until you reach a consistency you like.
Optional: add about 1/4 cup heavy whipping cream and beat on high speed for 3-5 minutes. 


Place in the refrigerator to let it firm up. 

For the chocolate ganache:
Place the heavy whipping cream on the stove until it reaches a simmer.  
Pour over the chocolate chips and let it sit for 30 seconds. 


Whisk to combine and let it sit until it thickens up.


Assembly: 

Pour a layer of thickened ganache and a thick layer of cream cheese frosting on the top of one of the cake rounds, which should be placed on a platter.  This will act at the filling between the two layers of cake.

Place the second cake round on top of the first.  Frost the top and sides of the cake with the cream cheese frosting and place in the refrigerator to let it firm up.

I drizzled some caramel over the top and also put some writing and decorations around the base of the cake with the extra chocolate ganache that I had.  


Have a great weekend everybody and Happy Baking!

Friday, September 28, 2012

Timeline Birthday Cake

So I actually made this awhile ago, for my Mom's 50th birthday last year but I wanted to share it with you all! This post is going to be more about the decorating techniques than the recipe itself, so stay tuned if you are interested.


You can use any kind of cake, but my Mom is a chocoholic so I made a devils food cake with a rich chocolate buttercream.  But for the purpose of this experiment lets say use your favorite cake and frosting. 

I wanted this cake to be really special so I got photos from all different times in my Mom's life: childhood, teenage years, marriage, each of my siblings being born, and present day.  


From left to right: her and her siblings when they were little, my grandpa with my mom and aunt, and my gorgeous mother at her engagement party. 


From left to right: my parents wedding day, me and my mom, and my brother and my mom.


From left to right: my sister and my mom, and our family with my dogs puppies!

If you decide to make this cake for someone, just try to think of defining moments in their life and/or people who are very important to them.  

What you will need:

- cake/frosting
- log cookies for the circumference of the cake
- toothpicks
- tape
- pictures or printed photos
- sprinkles (I used these light pink pearl candies)
- ribbon
- a birthday boy/girl!

Procedure (sounds like a science experiment?):

1.  Frost the cake with a thick layer of your frosting of choice and put it the fridge to set for 20-30 minutes.  
2.  Place the log cookies along the edge of the cake vertically until you cover all sides.  These cookies can be bought at any grocery store but I honestly cannot remember the name! They come in a big tin and shouldn't be too hard to locate.  They also come in vanilla and chocolate filled versions.  I broke them up into varying sizes for effect but that is your decorative call.
3.  To prepare the pictures, I printed them out from my color printer and attached them to a toothpick by taping the toothpick to the backside of the picture.  If I had more time I probably would have made the pictures double-sided so that the toothpick was not visible but I was in a crunch.
4.  Evenly place the toothpicks around the cake (with photos pre-attached) as seen above.
5.  Optional: Some sort of decorative feature in the center.  I put a big heart of pink pearl candies but you can do writing, sprinkles, etc.
6.  Tie a big bow around the cake to make it look like a present! 

Hope you try this out! It meant a lot to my Mom and I'm sure it will have an impact on whoever you want to make it for!  If you have any questions as always, let me know.

Happy baking!