Showing posts with label black tie. Show all posts

Wednesday, December 5, 2012

Cookies and Cream Cake

Most people love Oreo's don't they?  "Cookies and cream" brings me back to when I was a little kid because I used to love the ice cream flavor more than anything. 

It was two of my friends at school, Rachelle and Jordan's, birthdays over Thanksgiving break so I figured that when we came back to school I could make them something scrumptious! 


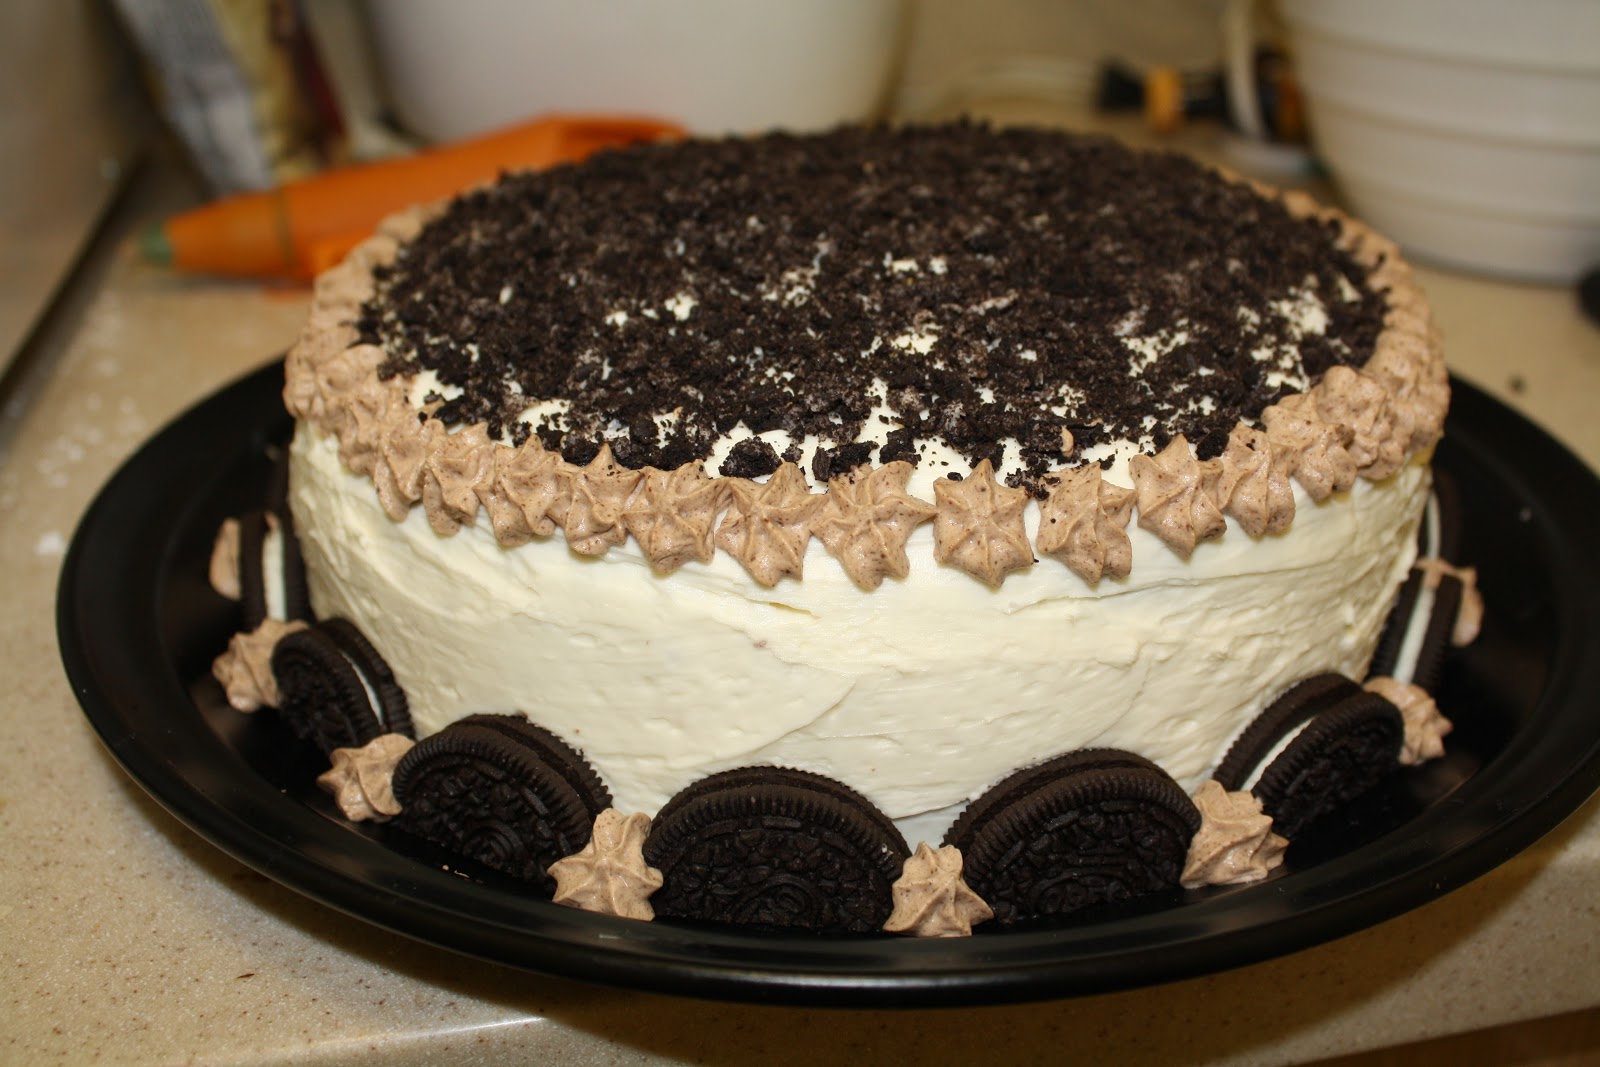
Believe it or not, this is a Cookies and Cream birthday cake and it was quite delicious if I may say so myself. 

The recipe entails the following: dark chocolate cake, Oreo cream cheese frosting filling, a buttercream coating, as well as chocolate whipped cream and Oreo's for decor. 

I have been so busy lately with school work and finals are coming up in about a week and a half so even having time to make this cake was a miracle.  I'm so happy I did though!  It's amazing how just sitting in the common room for an hour with a cake can make it vanish so quickly. 

My amazing boyfriends mom, Sharon, gave me a cute apron a few months ago with a cupcake pattern on it... 


Isn't it adorable? Thanks Sharon!

The decoration of this cake can be done in any way you like but I will explain what I did. After the buttercream frosting had set I chopped up a bunch of Oreos into fine crumbs and coated just the top of the cake with them.  Then with the remaining Oreos I had a cut them eat into half circles and placed them around the base of the cake.  Lastly, I piped the chocolate whipped cream both around the perimeter of the face of the cake and between the Oreos around the base.  I also added a heart on the top with my left over buttercream.  There are many ways that you could go about decorating this so be creative and have fun with it! 


Ok now that your mouth is watering I can give you the recipe... and I would like to acknowledge The Dainty Chef and Cooking Classy for inspiring me to make this wonderful creation.

Ingredients:

This recipe makes a regular sized 2-layer cake.

For the chocolate cake:
1¾ cup all-purpose flour
⅔ cup cocoa powder
1½ tsps. baking soda
½ tsp. baking powder
½ tsp. salt
¾ cup butter (this is one and a half sticks)
1½ cups granulated sugar
1 tsp. vanilla
3 eggs at room temperature
1¼ cups buttermilk


For the Oreo cream cheese filling:
4 ounces soft whipped cream 
1/2 cup soft unsalted butter
2 cups powdered sugar
5-7 chopped Oreos

For the buttercream:
3 sticks salted butter
4 cups powdered sugar
3-4 tbsp. heavy whipping cream
1½ tsp. vanilla 

For the chocolate whipped cream (This recipe makes a lot):
Approximately 1 cup of heavy whipping cream
Chocolate chips

*Note: Also need Oreo's for decoration (1 package is enough for the whole recipe)


Directions:

For the chocolate cake: 

Preheat the oven to 350.  Pre-grease and flour 2 8-inch round cake pans.  Make sure that you put a good amount of flour because I had a hard time getting my cake out. 
In a medium bowl combine dry ingredients: flour, cocoa powder, baking soda, baking powder, and salt. 
In a larger bowl, using an electric mixer, combine butter, sugar, vanilla, and eggs (1 at a time).  
On low speed, mix in the flour mixture, alternating with buttermilk (start and end with flour mixture). 
Divide batter amongst the 2 pans and bake for 30-35 minutes or until toothpick comes out clean.  Let cool completely before attempting to remove from the pans. 


For the Oreo cream cheese filling: 
Beat, with an electric mixer, the cream cheese and butter until smooth.
Gradually add powdered sugar and mix until very well combined.  
Stir in chopped Oreo's (not finely chopped). 
Once cake layers have cooled, spread the filling on top of one of the layers, and place the second layer over. 


For the buttercream frosting: 
Beat butter with an electric mixer until it turns a white color (at least 5 minutes). 
Slowly add in powdered sugar, heavy whipping cream, and vanilla until well combined and retains a thick consistency. 
I decided to use salted butter because it makes the sweetness not as intense and creates a perfect balance. 
Spread over the sides and top of the cake. 


For the chocolate whipped cream (optional):
Take a generous amount of heavy whipping cream and whip with an electric mixer.  
Slowly add in about a half cup of melted chocolate chips (this will be up to you on how much you want to add).  Keep whipping until it is thick enough to pipe. 
This recipe makes a lot of whipped cream so you can use it to put in hot chocolate or anything you want!


Putting it all together: 
As described above, I put crumbled Oreo's on the top, half-Oreo's around the base, and piped the whipped cream all around.  Get inspired by these pictures or come up with ideas of your own! 

Here is a picture of one of the pieces of cake... mmmm I miss it already.


Happy Birthday Jordy and Shelly! Love you guys!


This cake does have a lot of moving parts but they all come together very nicely and it is well worth all the work! 

Happy Christmas season and Happy Baking!


Sunday, August 19, 2012

Black Tie Mini Cupcakes

That's right, these are "black tie" cupcakes.  There's a bakery in my hometown that has a cupcake similar to these, called black tie cupcakes, so I figured I would borrow the title.  These are very simple... chocolate mini cupcakes with white chocolate cream cheese frosting and some chocolate shavings for garnish.

Feast your eyes.


My friend Alon was having a party at his house last night and my first thought was, "an excuse to bake something!"  So of course I surfed the internet for a few hours looking for inspiration and did not find anything but eventually came up with my own plan!


Funny story... this recipe made about 55 mini cupcakes and I probably brought about 30 over to my friend's house.  After a little over half of them were devoured we put them down on a very low table and completely forgot about the fact that there were 2 huge, hungry, chocolate labs roaming the house.  By the time we realized, the box that the cupcakes had previously been in was 100% empty.  No mess.  No evidence.  Sneaky pups. 

There's something about mini cupcakes that just makes me smile.  You can eat them in 1-2 bites with less guilt, therefore more happiness.  Not to mention they are adorable!

Ingredients: 

This recipe makes about 50-60 mini cupcakes.

Mini Chocolate Cupcakes (inspired by Hello, Cupcake! ):
1 3/4 cups all purpose flour
1/4 cup unsweetened cocoa powder
3/4 tsp. baking soda
1/2 tsp. baking powder
1/4 tsp. salt
1.5 sticks unsalted butter
3/4 cup lightly packed brown sugar
2 eggs
1/4 cup or 2 oz. of semisweet melted chocolate chips
1 cup buttermilk
1 tsp. vanilla

White Chocolate Cream Cheese Frosting (inspired by Country Living):
5 oz. melted white chocolate (I used Ghiradelli chocolate chips)
5 oz. cream cheese (I used 1/3 less fat Philadelphia cream cheese)
5 tbsp. softened unsalted butter
pinch of salt
1 tsp. vanilla extract
1 1/4 cup sifted powdered sugar


Directions:

Mini Chocolate Cupcakes:
Preheat oven to 350 degrees.  Line mini muffin/cupcake pans with liners. 
Mix dry ingredients together in a medium-sized bowl: flour, cocoa powder, baking soda, baking powder, and salt. 
In an electric mixer beat brown sugar and butter until creamy (several minutes). 
Beat in eggs one at a time, followed by the melted chocolate.  Tip: to melt to chocolate you can either place in a microwave-safe bowl and microwave in 30 second intervals or melt over simmering water.
Slowly beat in the dry ingredients alternately with the buttermilk (starting and ending with the dry ingredients).  Stir in the vanilla.


Spoon the batter into the cupcake liners, filling about two-third's full.  Tip: to make your life easier you can fill a Ziploc bag with the batter, cut a hole in the corner, and pipe it into the liners (this makes it a little bit faster/mess free). 


Bake for about 8-10 minutes, or until you insert a toothpick and it comes out clean. Allow to cool completely. 


White Chocolate Cream Cheese Frosting:

Melt the chocolate in a microwave safe bowl in 30 second intervals or in a bowl over simmering water. 
In an electric mixer beat cream cheese and butter until smooth and creamy.
Beat in white chocolate, salt, and vanilla and mix until well incorporated. 
Slowly add sifted powdered sugar until you reach the right consistency (smooth and creamy). 


Tip: I refrigerated mine for about 10 minutes before piping onto the cupcakes. 

Pipe onto the cupcakes once they have completely cooled using whichever technique you like.  I used a wide open star tip.  Start at the center of the cupcake, squeeze until you have your desired amount, and pull up quickly to make a nice pointy tip.


Chop some chocolate shavings off of a chocolate candy bar using a knife.  I used a basic Trader Joes dark chocolate bar.  Sprinkle over the top and your done!  Not too hard huh?


These are great for parties, handing out to friends, or just for yourself (we all need a little pick-me-up every once in awhile, don't we?).  I know that a recipe for 55 cupcakes sounds like a lot but they are so small and they do go fast! Hope you try it out and had a good weekend! 

Happy baking!